
This post describes the top, or overlay, of the curb for your traditionally waterproofed shower floor with a liner. The stuff you stick the tile to. It assumes (my posts often assume quite a bit – they are condescending little bastards…) that you already have the curb substrate built, your preslope in, and the liner installed. Those steps are described in the first couple of posts showing you how to build all that stuff here: How to create a shower floor for tile.
First I’ll answer a few questions I get constantly:
NO, YOU CAN NOT INSTALL HARDIBACKER TO YOUR CURB FOR YOUR TILE! (Unless you are using a topical waterproofing method for your shower floor.) There is no way to attach the hardi to your liner without puncturing it, which renders your waterproofing efforts useless. You need to have wire lath over your liner to hold it to the curb and wet mud installed over that to form a substrate for your tile.
Yes, you can use deck mud for your curb if you want to. However, it is not nearly as stable on the sides of your curb. It is not sticky. It may fall off the sides of your curb even after it cures, and take your tile with it. And it may crumble as you work with it after it cures, because you can’t pack it tightly enough to be dense enough on your curb. But yeah, you can use it… ![]()
No, you can not bond tile directly to your liner. No, you can not bond tile directly to your lath. Neither will last. Ever.
When you create your shower floor you are using deck mud. You need wet mud for your curb due to the vertical surfaces. Wet mud is almost identical to deck mud, it just has powdered masonry (or hydrated) lime added to it. A proper wet mud mix is 1 part portland cement, 1/2 – 1 part powdered masonry lime, and 4 parts sand. It is mixed just like deck mud except it needs more water. It should be the consistency of peanut butter (the creamy, not the chunky…)
Powdered lime is nasty stuff! Do not get it on your skin, it itches and burns at the very least and some people have horrible allergic reactions to it causing nasty rashes. Do not breathe it in! Seriously, it’s nasty stuff, handle it with extreme care.

Quikrete stucco base coat
But there is an easier way! I now usually use stucco base coat in place of wet mud when doing smaller areas such as just a curb or bench. It is a very similar mix. Although I don’t know what the exact ratios of the ingredients are it works and cures exactly like my wet mud. It is pre-mixed and bagged and you can find it in the concrete section of any big box store. So I’ll show you how to do your curb using that. Should you choose to mix your own wet mud everything is exactly the same.
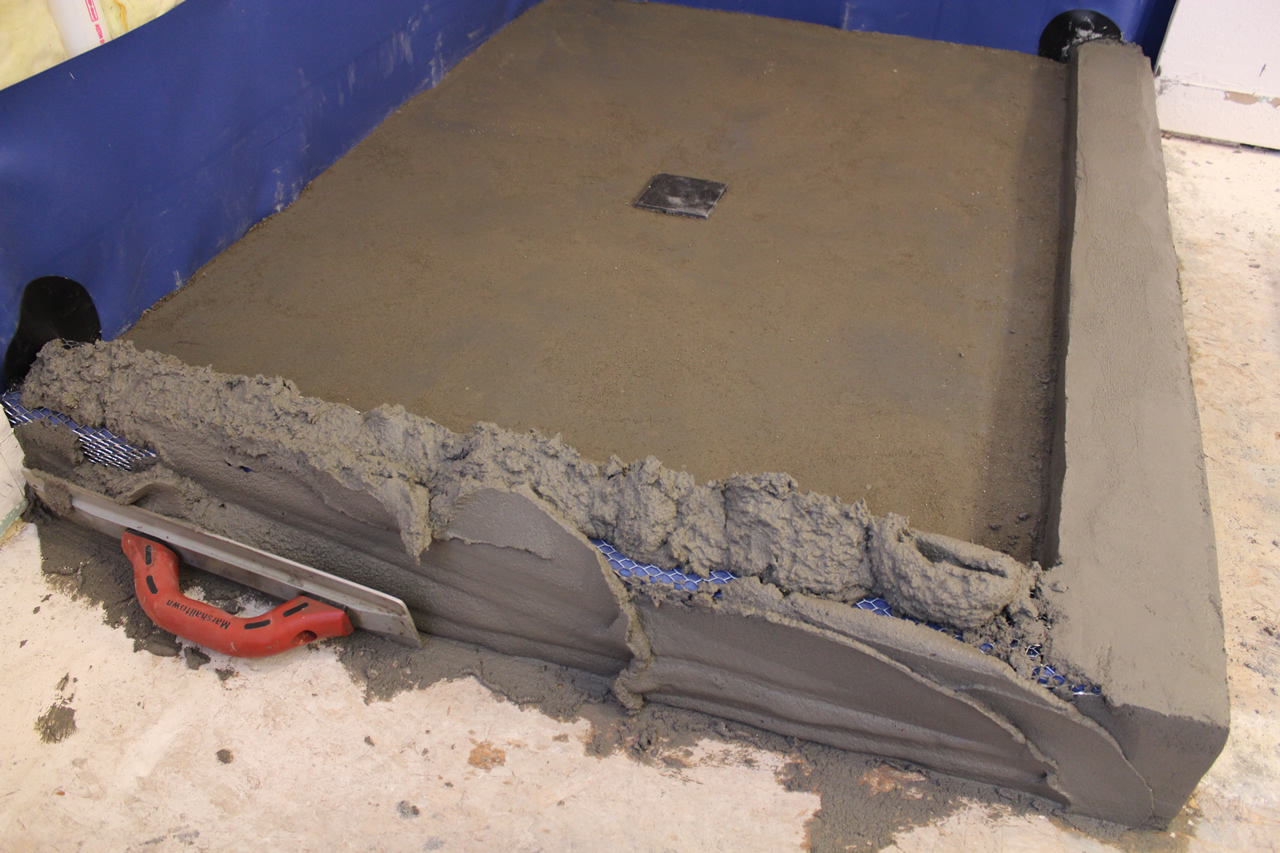
Once you get your liner installed and all your dam corners in you need to cut strips of wire lath to fit over your curb. USE GLOVES! Wire lath is sharp and will slice the crap out of your hands! So wear gloves and be careful.
Measure from the liner to the top of the curb, up over the top and down to the floor on the outside of the curb. Subtract an inch from that measurement and this is how wide you want your strips to be. Once you do that cut it the length of your curb.
All the photos I have are of a double curb with a 90 degree angle. If yours is just one curb across the front of your shower it works the same way, but I get a lot of questions about these as well. You can click on any of them for a larger version.

Bent lath for curb

Bent lath for curb
After you get your lath strips cut you need to bend them into a ‘U’ shape. Measure the distance from your liner to the top of your curb and mark that on your lath. That will be your first fold. Fold it all the way over onto itself, not just a 90 degree angle. You want to overbend your lath so that when you put it over the top of your curb it will hold the liner in place.
Your second bend will be the width of your curb away from the first. If you have a 2×4 as your curb just take a scrap 2×4 and place it in the nook of the first fold and fold it around the 2×4. Same works if you’re using bricks. Once folded your lath should look like the photos on the right.
Take the lath and place it tightly over the liner on the curb. You can nail the OUTSIDE of the lath to hold it in place, the deck mud for your shower floor will anchor the inside. DO NOT nail the inside or top of your curb!

Lath wrapped over the curb

Lath wrapped over the curb and corner
The lath should fit snugly against the liner. Overbending it like you did causes it to spring against the liner rather than flapping in the wind. ‘Spring against the liner’ isn’t exactly the best description, but it’s the best I can come up with. Damnit Jim! I’m a tile guy, not a creative novelist!
If your curb is created out of brick you obviously can not nail the outside of it. The spring action (see, now it’s an action and everything…) will hold it in place.
The lath DOES have the ability to puncture your liner! So you need to be a bit careful with it. But you do not need to baby it, the liners are much more durable than you might think. In other words – don’t be afraid to touch the liner with the lath. ![]()
Once it’s in place you have an anchor for your mud so it will stay in place. Once the mud is packed onto the curb it will pack up under the wires of the lath and hold in place. With the outside corner, like this shower, I also cut an additional small piece of lath to wrap around the top of that corner, like the second picture of the lath on the curb.

Properly mixed stucco base
Once your lath is on the curb go ahead and install your top mud deck. That part can be found in Part 4 of creating a shower floor.
Now mix up some stucco base coat. The water ratios on the bag will actually give you about the correct consistency, but begin with a little less water and add a bit more as you mix just to be sure you don’t get it too thin (runny). Again – it should be about the consistency of peanut butter.

Packing mix into the lath
YOU DON’T NEED TO MIX THE ENTIRE BAG! ![]() I just put that there because I know somebody will. You just need enough for the curb. I don’t know how much that is, I can’t see your curb. You can always mix more if you need to.
I just put that there because I know somebody will. You just need enough for the curb. I don’t know how much that is, I can’t see your curb. You can always mix more if you need to.
I use a magnesium mason’s finish float to form and finish my curb (and decks) but you can also use a wooden float or flat trowel if you don’t have one.

(very) rough finish on curb
Once it’s mixed just start by scooping a bunch of it onto the lath. Pack it into the lath well by running your float both ways to ensure it’s embedded beneath the wires of the lath, then start forming your curb. Ideally you want it about 1/2″ thick, but there is no real number for the thickness, so shoot for that. It’s not a big deal if you get it a little thinner or thicker than that. It’s just a guideline.
Packing and embedding mud into lath
You want to make sure that every side of your curb is straight (flat). You don’t want them to be wavy. You also want the top to slope slightly into the shower so water will drain into the shower rather than out of it. Your wood or bricks should also be sloped beneath the liner, but you want the tile on top sloped as well to rid the curb of most of the water.

Finished mud on curb
To finish the mix off and get a nice, smooth finish, dip your float or trowel in water and run it down the curb. It will smooth it all out. If you have any rough areas that just seem to get worse the more you mess with it (and you will) – leave it. After it cures you can always sand it down a bit to remove any uneven areas. Just make sure you have enough to sand down – that it’s overbuilt rather than underbuilt.

Finished curb ready for tile
It’s much easier to sand down to get what you need rather than trying to add something to the curb to get it where you need it.
Your curb does not need to be perfect! Oftentimes (typed with my pinkie in the air) the more you mess with it trying to get it perfect, the more you’re gonna screw it up. As long as it is flat (straight) and the top is level and sloped to the inside of the shower you can fix any imperfections after it cures or make up for inconsistencies with thinset as you set your tile.
Once it cures it’s ready for tile. You can bond tile directly to the curb now with thinset, it’s all ready to go.
Now, if you please, a moment of silence for the reader’s dog who burst into flames this morning because he tried to bond tile directly to the liner. You know who you are. And no laughing at him, before you read this you didn’t know how to do it either. (And he IS NOT the first one to do that!).
The dog in question is fine – we just had to snuff him out…
Common Mistakes and Fixes
Completing the entire curb before beginning the waterproofing aspect of the shower floor.
The waterproofing of the curb and the waterproofing of the shower floor are two parts of the same thing. They need to be done at the same time. The correct method is to build the FRAME of your curb only (the 2×4’s or bricks), then install your pre-slope, then the liner while correctly wrapping the liner up and over the curb at the same time, THEN completing your top slope and mud around the curb for your tile substrate. The liner needs to be tied into the curb at the same time, you cannot do that afterwards.
And yes, it HAS to be done – or your shower is going to leak.
Tile and grout are not waterproof. Your curb needs to be.
Using the incorrect material to build your curb.
Use dimensional lumber (regular 2x4s) over a wooden substrate, use bricks over a concrete substrate.
That’s it. Period.
NEVER, NEVER, NEVER use pressure-treated lumber. PT wood DOES NOT like dry installations. Provided you waterproof your curb correctly, that’s a dry environment. It will begin to LOSE moisture. When that happens it will shrink, twist, and do all sorts of weird foreign dances beneath your tile.
Tile doesn’t like that.
It will crack the grout, and may crack the tile as well.
Incorrect slope, or no slope at all.
The top of your curb needs to be sloped toward the inside of the shower. If it isn’t water may sit on top of it (best case scenario), or water will simply pour OUT of your shower. The easiest way to do this is while layering your 2x4s for the frame, place a drywall shim on the outer edge between two of them. If using bricks over concrete simply place a bit more thinset on the outside edge of the shower than on the inside. It doesn’t need to be sloped much, but it needs to be sloped. 1/8″ is plenty.
Frequently Asked Questions
Can I build a curb without the liner
Not if you are building your shower floor with a liner. There is no way to properly tie any sort of waterproofing into it, even with a topical waterproofing membrane. (There are exceptions, but very few)
What’s the correct curb height?
The minimum height of a shower curb is no less than 2″ above the finished height of the top of the drain. For a 3×5 shower three normal 2x4s is usually sufficient. That makes the outside of your curb 4 1/2″, and the inside ~1 1/2″, and meets the minimum height requirement. This is “normal”, but you can make it as low or high as you want, provided you meet that 2″ above the drain code.
Can I fix a leaking curb without tearing out the shower?
Maybe. I know that answer sucks, but it’s the truth. It can normally be repaired without intruding too much on the shower floor IF the liner is not compromised. The biggest problem is that the reason it’s normally leaking is because the liner is compromised. You’ll need to remove all the tile on the curb to figure out WHY your curb is leaking. Every leak is different, so there isn’t really one specific answer. You can ask about your particular scenario in the comments below and I can normally tell you what’s required to repair your shower.
What’s the best material for the curb?
There are currently several different prefabricated curb product, however, most of them are for topical membranes (kerdi, hydroban, redgard, etc.). There are a few you can use with a liner, but they are difficult to find, and a LOT more expensive than wood or bricks and wet mud. If you have one available you can absolutely use it. They work just fine provided you follow the correct installation procedures.
Related Posts
How to make deck mud
How to build a bench for your shower
How to create a shower floor


2 questions;
Building a shower with traditional pan; mortared preslope, PVC liner, top layer mortarbed for floor. Also built a bench (exactly the way you instructed, if course) with a mortar bed on top surface. Cement board for walls. You mentioned in another post no redguard on floor. Could you verify/explain? Redguard only vertical surfaces in my case?
Also, have type S mortar mix and some lime from another project/friends offloading their building materials on me. Can I use that to install my curb? Ratio? Need lime at all?
Your wisdom is greatly appreciated, you are a rock star…
Hi Reese,
No redgard over the floor when you already have a liner in there. 1 part type S, 2 parts sand and 1/2 part lime will work for your curb.
Hello Roger,
Without a doubt you are the best resource Google can find on shower installation. For that, thank you!
Thanks for the great service you provide.
Question on the curb: Construction is slab on grade – pressure treated sill plate 2X4 studs ( 9′ ceilings). Current plans (early stages) is for traditional mud pan and backer/topical water proof walls
Can I use pt for the sill on a new enslosing shower wall (to be built wall)?
Would it be ok to pour concrete for the curb ( instead of bricks) if yes should I drill into slab to make some connection ( rebar or some sort of cement anchor)
Hi MLB,
Yes, you can use pt for the sill provided there is a wall atop it and not tile encompassing it (like on a curb). Yes, you can form the curb out of concrete beneath the liner. You may want to anchor it with rebar.
Your tutorial has been incredibly helpful. I’m at the point of needing to wet mud my curb, but I can’t seem to find the stucco mix or hydrated lime anywhere. Is there an alternative? I read somewhere that a masonry mortar mix has premixed lime. Thanks!
Hi Robert,
One part masonry mortar mix to two parts sand should work for you.
Hey Rodger,Can I use denshield on my shower curb if I’m using Hydroban over it
Hi John,
As long as you are using the hydroban for your shower floor as well. You don’t want to screw anything through a regular liner if that’s what you have under your floor.
Roger,
I found your site via googling just in time to prevent disaster. I’m trying to send you $20 for one of your instruction manuals via Mastercard (my Paypal account is empty and I am up against the clock) but can’t seem to do it. Do you take Mastercard?
Also was wondering if inward sloping curbs will cause inward sloping glass doors.
Many Thanks,
Joe
Hi Joe,
I am only set up to take credit cards through paypal. You can pay with a cc through them as well. No, inward sloping curbs do not cause sloping glass doors.
Awesome website that I thankfully discovered before I begin on my tub turned walk-in shower. I am using brick on concrete slab foundation for my curb, and also plan to put a half glass block wall on top of the brick curb. Someone at the big box store suggested I bolt the bricks down in a few places under the glass block section to make it more secure less prone to tipping over. Do you have any thoughts on if that’s really necessary or a good idea? I plan to use Panel Anchors and reinforcing rods on each course of the glass block and it’s only a 40” wide by 72” tall wall attached on one side to the bathroom wall.
Thanks!
Hi Dan,
You don’t need to bolt anything down. The anchors and rods hold it more than well enough.
Roger,
The bathroom that you helped me build is (loosely speaking) complete. It’s the best shower I’ve ever used, and I get to use it every day. Woo-hoo! Once again, thanks for your help. I really don’t think I would have made it without you.
One final question for you:
How long did this project take?
http://tileartcenter.com/porcelain-tile-master-bathroom-remodel-in-fort-collins
Hey Steve,
I was there for about 2 1/2 weeks start to finish.
Hi Roger, great site, very helpful, when adhered to as you posted, therein lies my predicament. I focused on the “flat” and not the “level” part of your instructions. I built a rectangular base with the outside “corner” cutoff into two 45’s, for space constraints, room is only 69″x76″ so with shower, toilet and vanity I didn’t want to break my toes on the curb every time I stumbled in barefoot and uhh “tired”, yeah that’s it “tired”. Anyways my curb is not all level, at either wall it is 5-1/2″ and 6″ on the outside corners, my slope to the inside is uniform. Boneheaded move on my part, especially since I pride myself in in following instructions and perfectionism. What is the best way to fix the curb, add more stucco to the curb as needed or thinset up to level? I’m hopeful I don’t have to tear it out, but if I do so be it. Please help! Thank you in advance! Love your site!
I do have a concrete sanding block, but I am worried that I will degrade the integrity of my curb by taking too much off.
Hi James,
Level it out with a layer of thinset with more stucco mix over the top of it.
Thank you so much for the speedy reply Roger, will do, I was thinking of also building the curb out to allow placement of two full width bullnose tiles instead of trimming them all down, would you recommend this or just cut the dang things? It’ll only be 1/4″ cut from each tile so I figured maybe I can just build it out if I can to save me from screwing up on cutting such a small amount from each tile instead. in my work so that I can be when I’m done
  , so I have allowed my old carpentry mantra “measure twice cut once” to be compromised, UGH! Sometimes TOO much of the right incentive can be distracting to my attention to detail
Also, I caught another “mistake”. I did not allow for a tiles depth between the top of the final mud deck and the top of the drain grate, so they are flush, how do I correct this so that we do not cut our feet on the edges of the tiles around the drain? I found a spacer at both of the big box stores but the screw holes don’t match up with my Oatey drain pipe, so I bought two rubber washers as a possible fix while I was there just in case, so I don’t have to make another trip if that’s all I would need, but I am worried the drain grate will bend where not supported by the PVC on the pipe. So my real question is since I do have enough space on the threads of the pipe can I just back it out without degrading the mud deck, try to sand it down to the needed depth (I made the final deck 1 1/2″ and I know it would be tedious but I CAN sand it if that’s the BEST option), or is there another solution to my fudge up? I am being ridden hard, not in the good way
Thanks again for all the help, my dog has been fast enough to outrun my flames so far hahaha, so I’ll pay more attention in the future so he doesn’t finally get burned.
You should be able to back the drain barrel out and scrape / sand it down to where you need it.
Thanks, you’re a real lifesaver!
Roger, I am building a shower using denshield for the walls and I wanted to use redgard for the floor liner. If I seal corners and seams per instructions on denshield, is there any need to redgard the walls except maybe a foot up to create the pan liner?
Thanks for any help
Stewart
Hi Stewart,
No reason at all. That will be just fine.
I have my shower floor slope in place. The furthest place from the drain happens to be at the curb and there is 2 1/8″ from the top of the curb to the top of the preslope. I was hoping to keep my top coat layer to 1 1/4″. Assuming my tile is around 3/8″, do you feel like that curb height will be enough once I place my lath and stucco or should I add another 2×4? I don’t want to cut my pan liner before I figure that out. Thank you for all your help! I purchased your topical waterproofing and tile tips e-book. Great read!
Hi Jon,
It will be fine once you get the substrate over the curb. You can always add another if you want, but no need to.
I have two showers with leaking curbs. They are wood curbs and the builder did not extend the liner over the curbs. The tile was placed directly on the wood curb and as a result, the top three inches of the curbs have rot. The tile was also placed directly on the 2X4 door framing on both sides of the shower entry, so the bottom three inches of those areas is rotting. The good news: the liner is placed on a pre-slope and appears to be OK. The wall construction consists of cement board with tar paper backing. Is there any fix short of ripping out the floor and installing a new liner that extends over the curb?
Hi Pete,
Unfortunately not. It needs to be up and over the curb.
Hello Mr. Sir
I was wondering if you could provide some tips on deciding where to put the curb. I have a regular alcove shower (32″ x 61″ ‘ish). I am doing a liquid waterproofing membrane and plan on having a shower door. Do I just line up my curb’s 2x4s with the adjacent wall framing? Do I need to account for more thickness for any reason? Any other tips you have would be appreciated!
Thanks
Hi Joe,
I normally do it the thickness of the tile less than the wall framing. That way when you get the substrate and tile on the front of your curb the face of the tile will be flush with the walls on the side.
I really like this site and what I have been able to learn. A tilesetter trained me on how to set a shower pan,but I really like your method of setting the pre-slope. I did vary on the method for the curb and would appreciate your comments good or bad.
I first set the pre slope,then the liner and left a foot of liner all around. Then I set the final lower sheets of wall backer board to help compress the corners of the liner correctly and tested the liner for leaks. I then set the second layer of the shower pan because it was so much easier for me to use a laser to get the wall/pan elevations just right.
Now here is where i part company with your curb method. I do not like wooden curbs and I like the idea of forming in the accuracy of my curb. With the final shower pan poured,I screwed the front curb form to the floor. Set the inside l-shaped form on the finished pan and weighted it into place with 2 boxes of tile and my accuracy was assured. I then pounded mud into the forms and sloped the vinyl liner upwards and out to the outside top of the curb and cut and buried it into the mud. I them wrapped a previously anchored strip of galvanized wire mesh to wrap around the top edge of the liner extending toward the inside of the curb so the curb would not crack. So with this method,the liner is buried i/2 inch deep and 1/2 inch from the front edge of the curb. I hope that my dog does not catch on fire from this.
The disadvantage to this method is that it is three steps and three days,but there was plenty of other stuff to do on my project so no time really lost. I achieved a nice level curb with a perfect slope and straightness.
Hi Dave,
If I’m understanding correctly you have your liner folded up into the center of your curb? Like picture 17 here: Flawed If that’s the case I’ve torn out lots of them, the inside of the curb is always soaking wet and normally growing stuff. It should remain waterproof provided you place the door so it sits on the inside portion of the curb inside the liner, but there’s no guarantee.
As far as a wooden curb: When built correctly and the liner properly installed you can build your curb out of paper mache – it will NEVER see one iota of moisture. Doesn’t matter if it’s wood or rice paper, it never gets wet.
No,it does not look like photo 17. The liner is not just buried to the middle,but slopes up to the outside edge at a 45 degree constant slope.In other words,the pre-sloped pan liner is maintained but at a steeper angle once it enters the curb. Like slicing the curb on the diagonal and using wire mesh to keep it from cracking apart
If you still think that this is a problem,I could put Redcote on the top and inside face of the curb. Because it is my rental property,the Redcote on the entire floor is being considered as well
Anyway,now that I have enough usage allowance on my internet account,it looks like I will be buying at least 3 of your E-books
I am NOT a fan of having the liner through the middle of the curb. At all. I’ve just torn out way too many of those that failed and it is not an approved method. It should go up and over it. That said, if I were stuck with that situation I would definitely redgard over the curb. Do not redgard over the whole pan, that creates problems.
Hi Roger,
I’m working on my curb, putting the stucco on. Man! In my opinion THIS is the hardest part yet. I was just looking at your pictures above, and maybe I’m being too much of a perfectionist. (not saying yours isn’t perfect!!) I’ve been trying to get it completely flat and square, so much that I’ve removed some of it after letting it set up.
Please tell me what I am going for. Level, straight, flat…?
Ugh.
Help!
Thank you!
Jan
#2 – Okay, well, I just read the paragraph that says “Your curb does not need to be perfect! Oftentimes (typed with my pinkie in the air) the more you mess with it trying to get it perfect, the more you’re gonna screw it up. As long as it is flat (straight) and the top is level and sloped to the inside of the shower you can fix any imperfections after it cures or make up for inconsistencies with thinset as you set your tile”.
My bad. I think I’m overworking it. Back to work I go…. (sorry!)
See?
Hi Jan,
On the curb you need both flat and level. You can, however, make up for small inconsistencies with thinset as you lay the tile, so it doesn’t need to be absolutely perfect.
Hi Roger, Yep, it’s me again.
This project is taking me forever – well, to be honest, if I added up all the different times I’ve actually worked on it, maybe it’s not taken that long….but, per my social life, it is dragging on and on and….
Need your opinion please. I’m still working on stucco-ing my curb. I got to the end and one end of the curb is lower than the other. So, I added stucco mix on top of the already set and dry part to balance it out. Should I scratch it – take it all off and re-do? Or do you think the new mix will stick to the already set concrete? I’m worried. I’m a girl.
THANK YOU for your help!
Jan
Hi Jan,
It should be fine provided your mix was wet enough. If it was going to come apart you would see a crack between the two layers the next day or two.
Roger,
Great site. I happen to have an 80 pound bag of stucco base which I intend to use for my curb. Since I have an 80 pound bag and it is so similar to deck mud, is there any reason I shouldn’t use the stucco base for either my preslope or mud pan?
Thanks,
Hans
Hi Hans,
Yes, there is a reason not to – it contains lime, which means it’s sticky. It can be formed over the curb just fine but trying to screed a flat slope over a larger area is nearly impossible. Because it’s sticky.
Thanks for the reply! I got my preslope done today, liner and top will be tomorrow; Thanks to you it’s going very well.
Hans
P.S. It sure is fun pounding the hell out of the deck mud.
Hi Roger,
Just wanted to say when I read your blog ( which I only found a week ago , after I started my shower) you remind me of my father. He passed away 4 years ago @ 51. I am 34 now.
Weird, I know but I can almost hear him talking to me as I read your work. He also was a wealth of knowledge. He was always reading and learning to better himself and had great passion in life and for any project he or we did. He too also liked to do things the right way.
We built a custom shower 12 years ago. The information is so much more available. It alsomost seemed like we where ahead of our time a bit back then.
Anyways the reason for my question…. Is it alright if I have used wood 2X4’s for my curb on a cement floor in the basement? I put moisture barrier under the 2X4 similar to a wall in your basement. The liner is over the curb and I have lathed and mudded it. I didn’t think about concrete blocks until I found you a week late. The wood sweeling thing makes sense now. Will this be alright?
Thank you in advace for your time and information
Hi Dave,
It’s my experience (personally) that people who have more knowledge than any one person should have about something are the ones who enjoy life the most. I know that sounds strange, but when we constantly strive to learn we are extremely curious about the world around us, and absolutely love learning everything we can about it. Sorry about your dad, that is WAY too young. It sounds like he lived every day the way he wanted, though.
Your curb MAY be okay, and it may not be. It depends on the amount of moisture present and offgassing in your concrete. While not in direct contact with the concrete, vapor can enter the wood through the sides as well. I would replace it with bricks at this point if it is at all possible. It’s normally fine unless you have excess moisture in your concrete.
Roger,
Thank you for your response and advise. You really are a professional and seem like a great man
Have a good day
Deep sigh….just realizing that when I did my top mud deck this morning I of course neglected to first put the lath (well kirb-perfect) in place over the curb!! I’m an idiot and my dog just exploded.
Any ideas on how to anchor the shower side of lath or kirb-perfect now that I’ve messed up and finished the top slope? I realize I can’t do anything that will puncture the liner. The mud deck turned out great and tearing it out is the last thing I want…got to do that once with the preslope already.
Aargh! Paul
Hey Paul,
You can cut the kirb-perfect down on the inside so it rests on top of the mud deck. You can also dig a shallow channel out of the mud to get it below the surface if you want, although it isn’t really necessary. Once mudded it will stay in place just fine.
Thanks Roger- great to hear it’s not a deal-breaker!
hi Roger
Curb question although it relates to one of my posts elsewhere about our (possible) barrier free shower… which may not be so barrier free the closer we get to actually putting everything in place… i digress, but haven’t had any java jolt yet this morning and been up since 3 thinking about this and other shower related stuff… oh yeah back to the point!
we are going to be using the 55″ kerdi pan with kerdi-line linear drain… no probs so far I think as it will now fit in quite nicely with the dimensions we can use for our glass wall and door assembly… however we are now planning on using the Kerdi Shower SC curb (PS40 ploystyrene) as our curb… not the whole thing though… we’ll be slicing it at least in half… then using the kerdi band to waterproof the joint between curb and the pan… we plan on installing some cut 1″ marble pieces (question on finishing that elsewhere) on top of and on the front and back of the curb using thinset… the glass walls (42″ and 24″ will then be installed on top of that… does this sound like it will work?…
if it does so that we can ensure no leakage between the marble pieces what would you suggest we join them with. they have a product called kerdi-fix that is a bonding compound… would that work?
Hi Dan,
I don’t quite understand what you’re asking me here. The schluter base, as well as the curb, still needs to be waterproofed with the kerdi sheet membrane. Both are completely waterproofed before any tile is installed. If it is there will be no leakage in your shower, between the marble pieces or otherwise. Your plan sounds just fine, your waterproofing is beneath the marble. I’m just not understanding the question.
Thanks Again Roger
The Kedri Base seems to be covered with the Kedri already… in their installation video (intermediate installation which is what ours will be) they install the base, or pan, then the ditra around the pan and seal up all joints with kerdi band… the linear drain is inserted in the middle of the pan and sealed using the attached bands of kerdi. once that is done I would then install the marble using thinset (modified or unmodified with marble??)
You must be in Canada or Europe – we don’t have those here yet. Unmodified.
Hi Roger,
We are getting ready to have someone install the traditional mud pan in our shower. The shower is 2×4 framed and has no substrate on the interior walls yet. We will use hardibacker and topical waterproof like Hydroban once the pan has been completed.
We have not yet installed the 2×4 curb and we were ready to do this today. I am wondering how the finished width of the curb will align with the opening into the shower. The framed opening where the shower glass door will be is about 30″ before tile and backer on the door opening. The door is framed to be a sigle hinged door between a framed wall on each side . If we use (2) 2×4 on the flat for the curb and align these 2×4’s with the framed walls which will already has 1/2 drywall on the room side the curb and will have the backer board and tile on the shower side, once the 2×4 curb is covered in shower pan liner, lath, 1/2″ stucco mud and then tile -all of which collectively adding nearly an inch to the curb on both the inside and the outside the finished curb will extend beyond the room side drywall almost 1/2″ and a little beyond the backer board/tiled interior shower walls about 1/2″
In other words, the tiled curb is wider than the inside shower tiled walls and outside drywalled walls. Is this correct or have I had too many pepsis??
Is there a way to make the tiled curb line up with the finished walls or do we expect the curb tho extend beyond each side of the finished wall ?
Thanks again
Jean
Hi Jean,
The curb can be whatever thickness you want it to be. If normal 2×4’s are too thick then create it out of plywood or smaller pieces of lumber to get the thickness you need.
Hi Roger,
thankfully my wife is not in the room, so I can admit that I almost set fire to the dog. I just read the bit about the metal lath, of course I wouldn’t actually have really tried to bond the tile directly onto the shower liner. No No.
Errr thanks for all the info, my dog is fine now.
Hey Roger,
Just thought I’d put my foot in my mouth and my 2 cents in regarding the question fro Rolf on this subject. I reread his post a couple of times and I think I see where the confusion is…..
The instruction sheet he linked to in his post was a dual was a dual product sheet that covered both the noble SOLID curb (which he said he bought) and the noble curb overlay which you referred to, but he got the solid curb…… Then he said he used a Chloraloy liner and NOT the Nobleseal membrane, over the SOLID curb. He either missed the Nobleseal membrane requirement (which you can I guess thinset tile directly to) or else the thinks Nobleseal membrane and Chloraloy liner are the same thing, which they are not, totally different composition as you know.
Sorry Rolf, but please reread the instructions and correct your work before you have a real mess on your hands.
Thanks Bob. Didn’t even think about their two different curbs. You’re correct, the solid curb requires the noble membrane which is bonded directly over it.
Excellent timing on the post as I’m just about to tile my curb. And your site has been very helpful throughout my shower renovation project.
However, I had been planning to thinset the curb tiles directly to the liner because the manufacturer’s instructions say I can do that. (I’ve installed a Noble Company solid poly curb and have thinsetted the Chloraloy over that) The instructions for installing the curb (http://www.noblecompany.com/Portals/0/PRODUCT%20INFO/Installation%20Instructions/Noble%20Curb%20Installation%20Instructions.pdf) show the tiles being directly bonded to the liner.
I suppose it’s probably ok to just follow the manufacturer’s instructions, but what do you think?
Hi Rolf,
I think that your reading the instructions incorrectly. That is a curb overlay. The tile is bonded directly to it, but the curb is installed OVER the liner. So yes, it’s ok to follow their instructions.
I am planning on re-doing the tile in my shower. the house was built in 2006 with those plain white gloss tiles. I was wondering if I could reuse my mud curb and floor or do I have to knock it all down and build another one and mud it?
Hi Joshua,
If your shower floor and curb are in good condition and do not leak, and you can get the tile off without damaging it, then you can reuse it.
Hi Roger,
Thanks for all the great information. I wish I had seen your tip on making walls flat before getting started on my shower. I’ve got some caulking questions. I’m using kerdi and understand water seeps between the kerdi membrane and the tile. I’m about to grout and then caulk the corners, but am wondering if I should be forcing the caulk all the way into the gap between the wall and floor tiles. Might that impede water drainage from behind the wall tiles? You also show using weep holes for bath tub surrounds. Should that also be done in a tiled shower? Lastly, do I caulk the corners in a niche, inside, outside and at the shelf ends?
Thanks again
Steve
Hi Steve,
You should only be installing the caulk to about 3/4 the depth of the tile, not all the way to the substrate. If your shower floor is tiled (and properly built) the weeping properties are built into the kerdi substrate beneath the tile, no need for weep holes. In niches I only silicone the inside changes of plane, everything else gets grout.