
This post describes the top, or overlay, of the curb for your traditionally waterproofed shower floor with a liner. The stuff you stick the tile to. It assumes (my posts often assume quite a bit – they are condescending little bastards…) that you already have the curb substrate built, your preslope in, and the liner installed. Those steps are described in the first couple of posts showing you how to build all that stuff here: How to create a shower floor for tile.
First I’ll answer a few questions I get constantly:
NO, YOU CAN NOT INSTALL HARDIBACKER TO YOUR CURB FOR YOUR TILE! (Unless you are using a topical waterproofing method for your shower floor.) There is no way to attach the hardi to your liner without puncturing it, which renders your waterproofing efforts useless. You need to have wire lath over your liner to hold it to the curb and wet mud installed over that to form a substrate for your tile.
Yes, you can use deck mud for your curb if you want to. However, it is not nearly as stable on the sides of your curb. It is not sticky. It may fall off the sides of your curb even after it cures, and take your tile with it. And it may crumble as you work with it after it cures, because you can’t pack it tightly enough to be dense enough on your curb. But yeah, you can use it… ![]()
No, you can not bond tile directly to your liner. No, you can not bond tile directly to your lath. Neither will last. Ever.
When you create your shower floor you are using deck mud. You need wet mud for your curb due to the vertical surfaces. Wet mud is almost identical to deck mud, it just has powdered masonry (or hydrated) lime added to it. A proper wet mud mix is 1 part portland cement, 1/2 – 1 part powdered masonry lime, and 4 parts sand. It is mixed just like deck mud except it needs more water. It should be the consistency of peanut butter (the creamy, not the chunky…)
Powdered lime is nasty stuff! Do not get it on your skin, it itches and burns at the very least and some people have horrible allergic reactions to it causing nasty rashes. Do not breathe it in! Seriously, it’s nasty stuff, handle it with extreme care.

Quikrete stucco base coat
But there is an easier way! I now usually use stucco base coat in place of wet mud when doing smaller areas such as just a curb or bench. It is a very similar mix. Although I don’t know what the exact ratios of the ingredients are it works and cures exactly like my wet mud. It is pre-mixed and bagged and you can find it in the concrete section of any big box store. So I’ll show you how to do your curb using that. Should you choose to mix your own wet mud everything is exactly the same.
Once you get your liner installed and all your dam corners in you need to cut strips of wire lath to fit over your curb. USE GLOVES! Wire lath is sharp and will slice the crap out of your hands! So wear gloves and be careful.
Measure from the liner to the top of the curb, up over the top and down to the floor on the outside of the curb. Subtract an inch from that measurement and this is how wide you want your strips to be. Once you do that cut it the length of your curb.
All the photos I have are of a double curb with a 90 degree angle. If yours is just one curb across the front of your shower it works the same way, but I get a lot of questions about these as well. You can click on any of them for a larger version.

Bent lath for curb

Bent lath for curb
After you get your lath strips cut you need to bend them into a ‘U’ shape. Measure the distance from your liner to the top of your curb and mark that on your lath. That will be your first fold. Fold it all the way over onto itself, not just a 90 degree angle. You want to overbend your lath so that when you put it over the top of your curb it will hold the liner in place.
Your second bend will be the width of your curb away from the first. If you have a 2×4 as your curb just take a scrap 2×4 and place it in the nook of the first fold and fold it around the 2×4. Same works if you’re using bricks. Once folded your lath should look like the photos on the right.
Take the lath and place it tightly over the liner on the curb. You can nail the OUTSIDE of the lath to hold it in place, the deck mud for your shower floor will anchor the inside. DO NOT nail the inside or top of your curb!

Lath wrapped over the curb

Lath wrapped over the curb and corner
The lath should fit snugly against the liner. Overbending it like you did causes it to spring against the liner rather than flapping in the wind. ‘Spring against the liner’ isn’t exactly the best description, but it’s the best I can come up with. Damnit Jim! I’m a tile guy, not a creative novelist!
If your curb is created out of brick you obviously can not nail the outside of it. The spring action (see, now it’s an action and everything…) will hold it in place.
The lath DOES have the ability to puncture your liner! So you need to be a bit careful with it. But you do not need to baby it, the liners are much more durable than you might think. In other words – don’t be afraid to touch the liner with the lath. ![]()
Once it’s in place you have an anchor for your mud so it will stay in place. Once the mud is packed onto the curb it will pack up under the wires of the lath and hold in place. With the outside corner, like this shower, I also cut an additional small piece of lath to wrap around the top of that corner, like the second picture of the lath on the curb.

Properly mixed stucco base
Once your lath is on the curb go ahead and install your top mud deck. That part can be found in Part 4 of creating a shower floor.
Now mix up some stucco base coat. The water ratios on the bag will actually give you about the correct consistency, but begin with a little less water and add a bit more as you mix just to be sure you don’t get it too thin (runny). Again – it should be about the consistency of peanut butter.

Packing mix into the lath
YOU DON’T NEED TO MIX THE ENTIRE BAG! ![]() I just put that there because I know somebody will. You just need enough for the curb. I don’t know how much that is, I can’t see your curb. You can always mix more if you need to.
I just put that there because I know somebody will. You just need enough for the curb. I don’t know how much that is, I can’t see your curb. You can always mix more if you need to.
I use a magnesium mason’s finish float to form and finish my curb (and decks) but you can also use a wooden float or flat trowel if you don’t have one.

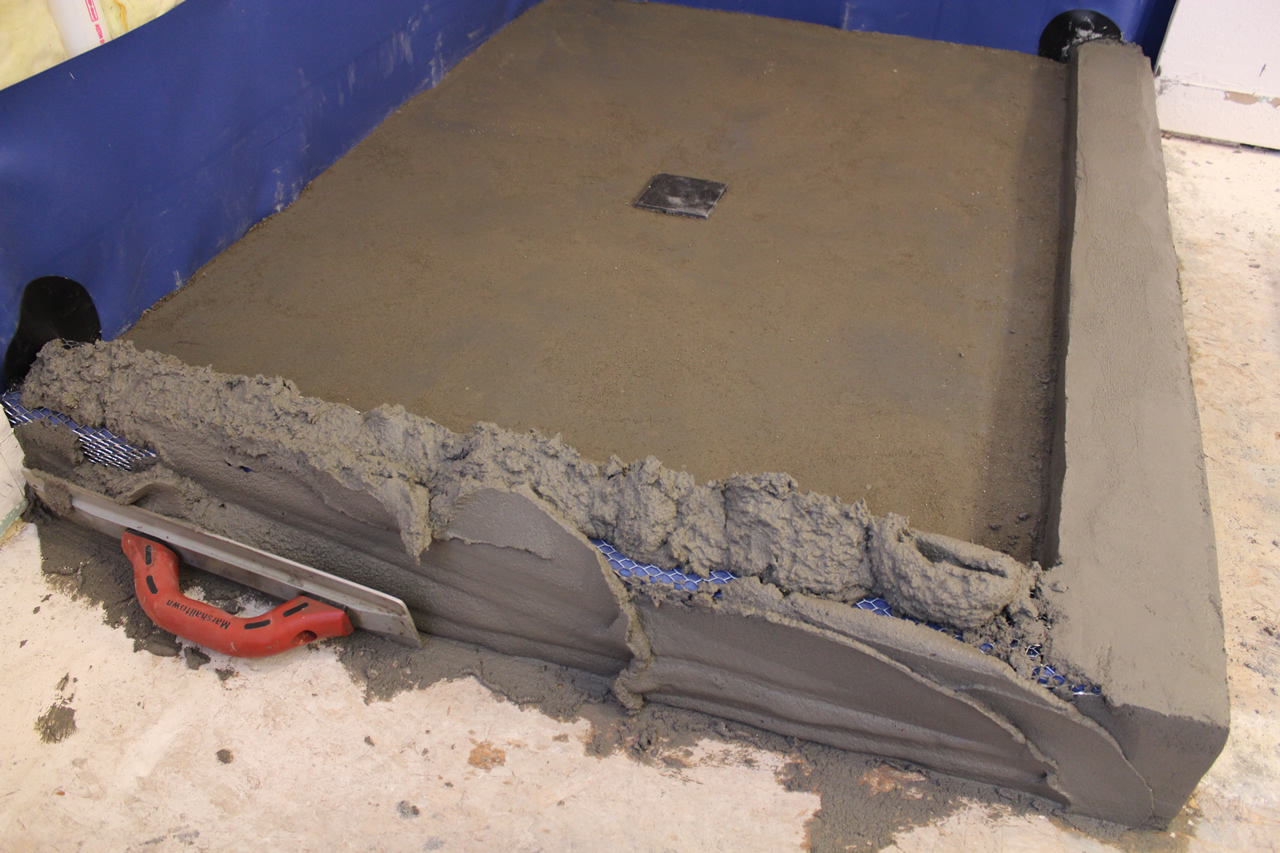
(very) rough finish on curb
Once it’s mixed just start by scooping a bunch of it onto the lath. Pack it into the lath well by running your float both ways to ensure it’s embedded beneath the wires of the lath, then start forming your curb. Ideally you want it about 1/2″ thick, but there is no real number for the thickness, so shoot for that. It’s not a big deal if you get it a little thinner or thicker than that. It’s just a guideline.
Packing and embedding mud into lath
You want to make sure that every side of your curb is straight (flat). You don’t want them to be wavy. You also want the top to slope slightly into the shower so water will drain into the shower rather than out of it. Your wood or bricks should also be sloped beneath the liner, but you want the tile on top sloped as well to rid the curb of most of the water.

Finished mud on curb
To finish the mix off and get a nice, smooth finish, dip your float or trowel in water and run it down the curb. It will smooth it all out. If you have any rough areas that just seem to get worse the more you mess with it (and you will) – leave it. After it cures you can always sand it down a bit to remove any uneven areas. Just make sure you have enough to sand down – that it’s overbuilt rather than underbuilt.

Finished curb ready for tile
It’s much easier to sand down to get what you need rather than trying to add something to the curb to get it where you need it.
Your curb does not need to be perfect! Oftentimes (typed with my pinkie in the air) the more you mess with it trying to get it perfect, the more you’re gonna screw it up. As long as it is flat (straight) and the top is level and sloped to the inside of the shower you can fix any imperfections after it cures or make up for inconsistencies with thinset as you set your tile.
Once it cures it’s ready for tile. You can bond tile directly to the curb now with thinset, it’s all ready to go.
Now, if you please, a moment of silence for the reader’s dog who burst into flames this morning because he tried to bond tile directly to the liner. You know who you are. And no laughing at him, before you read this you didn’t know how to do it either. (And he IS NOT the first one to do that!).
The dog in question is fine – we just had to snuff him out…
Common Mistakes and Fixes
Completing the entire curb before beginning the waterproofing aspect of the shower floor.
The waterproofing of the curb and the waterproofing of the shower floor are two parts of the same thing. They need to be done at the same time. The correct method is to build the FRAME of your curb only (the 2×4’s or bricks), then install your pre-slope, then the liner while correctly wrapping the liner up and over the curb at the same time, THEN completing your top slope and mud around the curb for your tile substrate. The liner needs to be tied into the curb at the same time, you cannot do that afterwards.
And yes, it HAS to be done – or your shower is going to leak.
Tile and grout are not waterproof. Your curb needs to be.
Using the incorrect material to build your curb.
Use dimensional lumber (regular 2x4s) over a wooden substrate, use bricks over a concrete substrate.
That’s it. Period.
NEVER, NEVER, NEVER use pressure-treated lumber. PT wood DOES NOT like dry installations. Provided you waterproof your curb correctly, that’s a dry environment. It will begin to LOSE moisture. When that happens it will shrink, twist, and do all sorts of weird foreign dances beneath your tile.
Tile doesn’t like that.
It will crack the grout, and may crack the tile as well.
Incorrect slope, or no slope at all.
The top of your curb needs to be sloped toward the inside of the shower. If it isn’t water may sit on top of it (best case scenario), or water will simply pour OUT of your shower. The easiest way to do this is while layering your 2x4s for the frame, place a drywall shim on the outer edge between two of them. If using bricks over concrete simply place a bit more thinset on the outside edge of the shower than on the inside. It doesn’t need to be sloped much, but it needs to be sloped. 1/8″ is plenty.
Frequently Asked Questions
Can I build a curb without the liner
Not if you are building your shower floor with a liner. There is no way to properly tie any sort of waterproofing into it, even with a topical waterproofing membrane. (There are exceptions, but very few)
What’s the correct curb height?
The minimum height of a shower curb is no less than 2″ above the finished height of the top of the drain. For a 3×5 shower three normal 2x4s is usually sufficient. That makes the outside of your curb 4 1/2″, and the inside ~1 1/2″, and meets the minimum height requirement. This is “normal”, but you can make it as low or high as you want, provided you meet that 2″ above the drain code.
Can I fix a leaking curb without tearing out the shower?
Maybe. I know that answer sucks, but it’s the truth. It can normally be repaired without intruding too much on the shower floor IF the liner is not compromised. The biggest problem is that the reason it’s normally leaking is because the liner is compromised. You’ll need to remove all the tile on the curb to figure out WHY your curb is leaking. Every leak is different, so there isn’t really one specific answer. You can ask about your particular scenario in the comments below and I can normally tell you what’s required to repair your shower.
What’s the best material for the curb?
There are currently several different prefabricated curb product, however, most of them are for topical membranes (kerdi, hydroban, redgard, etc.). There are a few you can use with a liner, but they are difficult to find, and a LOT more expensive than wood or bricks and wet mud. If you have one available you can absolutely use it. They work just fine provided you follow the correct installation procedures.
Related Posts
How to make deck mud
How to build a bench for your shower
How to create a shower floor


Roger, the box stores near me don’t have masonry lime OR stucco mix. Closest thing I can find (without traveling hours away) is Type S Mason Mix. Would this work for the curb?
Hi Jeremy,
Deck mud would work better. Type S is a structural mortar, not really conducive to thicker layers over your curb, it’s meant to hang stuff like rock.
Thanks Roger. The first problem was not being able to find masonry lime. Would powdered garden lime work the same? It’s pretty easy to find locally.
Just an update (not to blow up your comments section) – I found that my local HD carries type-N mortar mix, which is 1-1-6 portland-lime-sand. I’m thinking this will work well for fat mud. I’ll let you know how it goes, this may be a good alternative for others who are having trouble finding lime or stucco mix. Thanks!
Hi Jeremy,
Yes.
How do you recommend waterproofing a half wall that separates a garden tub and shower. My main concern is where the top of the half wall and the adjacent wall meet. I had planned on traditional waterproofing but not really sure how to go about this specific area. I assume it would be similar to how the shower curb gets waterproofed but there are different variables involved. Another dynamic is water that penetrates the grout and tile on the top side of the half wall during a shower will have the potential to go the opposite direction and toward the tub side of the wall. Will I have to leave weep holes at the bottom of the tile that surround the tub to account for water accumulation between the tile and waterproof membrane? Any suggestions would be much appreciated.
Hi Gary,
First and foremost – the top of your wall needs to be slanted toward the inside of the shower! That is imperative. You can waterproof it with the liner under the backer. It helps to place a bead of silicone at that corner just to prevent as much water as you can from getting into and beneath the backer.
Roger-
If I use hardiebacker as the top surface of my floor, do I need roofing felt and lathe between the top of the hardibacker and the deck mud? Or should I treat the hardibacker surface like a concrete surface – that is, use thinset as the bonding agent between floor and mud? (I am installing 1/4″ hardbacker on top of 1×6, diagonal 1950s sub-floor, only so I can fill the gaps/cracks between the sub-floor boards, so I can then tile the floor outside the shower.)
Thx,
Charlie
Hi Charlie,
You can do either, the thinset is much faster and easier.
Roger,
My finished curb looks somewhat like the picture above of the “(very)rough finish on curb”. I couldn’t leave it alone. I just had to mess with it. Now I am going to use a sanding brick to try and get an even finish. I’m not sure I even have a slant on top. Since there is the base coat stucco, couldn’t I use thin set to attach Durock to all three side to achieve the needed finish and then regard the Durock prior to tile. I think I sent this twice.
Hey Rick,
You can, but I honestly don’t know if it would last in the long term. It would be easier and quicker to just sand it down.
For those of you who are having a hard time getting your mud to be straight,you might try to make a simple L-form out of plywood. Make one for the inside of the curb and one for the outside. The idea would be that if your mud starts to slump down a bit from a too wet mix or the fact that you over-worked the mud while applying it,the form might be able to hold the mud straight . It is simple enough to hold the form. Use tile to weight it true for the inside and screw it to the subfloor on the outside.
I suppose that you could use the form to set the final grade for the top,but setting the grade to the outside and then sloping it slightly to the inside is all that should be necessary.
The idea is to pack the mud first and moosh the form against it to hold it true. Form release or painters plastic on the inside of the plywood will make it easy to remove. Of course,Roger gets the final say on whether he thinks142this would work for the rest of us…
I mixed up fat mud (4 lb sand and topping mix, 1 lb sand, 1 lb lime) and it seemed to work out nicely on the curb. This morning I have a few hairline cracks running perpendicular to the length of curb. It seems pretty solid? Is it time to get out the hammer and chisel? If so any suggestions on what might have gone wrong?
Dave.
Hi Dave,
Just a little too much water, caused it to shrink a bit. It’s perfectly fine.
I have a concrete slab and will be using bricks for the curb. I’m also using Hydro ban for water proofing.
1. Do I need to attach durock to the brick curb?
2. Do I need to use the Hydro Ban on the ceiling (it is an open shower)?
I was ready to double my construction cost on a complete schluter system because I couldn’t find reliable info on traditional construction. Thank you for this site and your books. They gave me a clear picture / path and multiple excuses to drink beer..
3. Can I use regular thinset for tiling over the hydro ban or do I need to use a laticrete something?
3. Regular modified thinset is fine.
Hi Matthew,
1. No, hydroban right to the bricks or cover them with wet mud or stucco mix first.
2. No
Excuses in writing to drink beer are always money very well spent.
Hi Roger, love your site!
I would like to install new tile on my bathroom floor. The problem is that the old tile is installed on top of one inch of gypcrete which was poured onto 3/4 osb. I believe the gypcrete is there to suppress fire and noise between condo units. I don’t think the tile will come out without destroying the gypcrete so can I just tile over the old tile? and what is best way to do that? The old tile is 6 X6 inch and in good condition.
Hi Keith,
Yes, you can. You’ll need to scarify the existing tile (remove the shiny) and go over it with a thinset approved for use over tile. Laticrete 255 and mapei ultraflex 3 are two of those, there are many others.
Hi Roger,
First all your info is amazing and thank you for taking your time to explain everything. So I am doing a tear out of master walk in shower. I will be using Redgard as my membrane. I am putting Durock up, have to re do/touch up pre-slope (When getting tile up some has been chipped up with the white mastic/thinset. Plus this will allow me to hopefully undo drain and make sure weep holes are not blocked. What do I use for this with? Cement, Stucco??). Than install a bench the wife wants using 2 x 4’s, plywood (what Thickness??), than Durock. Mesh tape all seams use Versond thinset for seams and cover screws.
The wife wants a nice curb there is only a little curb there now maybe 2″ or less for step down. How do I create this curb? Or I am not opposed to buying preformed as long as they are reasonably priced. It is a straight length about 46″ or so.
After the curb I will put Redgard on everything, deck mud slope, thinset, tile, grout. Oh and the wife picked out a small tumbled marble for floor not sure if that matters or not.
Hi Nick,
Use deck mud for everything you tear out / need to repair. If your substrate is wood use 2×4’s to build the curb, then cover with backer. If it is concrete use bricks (the kind without holes) and you can either build them up with stucco mix or just use redgard right over them. Dig out the existing deck mud all the way around the drain to check the weep holes, only way to do it. There is likely not anything in there keeping them open, you can add spacers, tile, etc. at this time to keep them open, then repair with new deck mud.
I really appreciate your site! I installed my shower curb per your instructions (over stacked 2X4’s). When finished the distance between the front of the curb and the back is just 4 1/8″. In other words I’m afraid the thickness is far less then 1/2″ and this worries me. Can I add mud to the existing curb to make it more stable and how would I do this?
Hi Steve,
Not sure what ‘thickness’ you’re speaking of? It’s stable, if you want to make it thicker or higher you can do it with deck mud, you’ll just need to put down thinset so it will bond to the existing curb.
Roger,
I’m pretty handy around the house but have never built a custom shower and curb. So I hired someone and they built it up to the liner and I will finish it from there. They nailed the liner on the outside of the curb as well as on the top. Then they told me to go ahead and screw in hard-board all over the curb. I like your method better and plan to add Kerdi on top. Just curious about the potential for problems with nails on top of the curb.
Hi Scott,
Remove the nails and patch the holes. It WILL lead to problems. Do not install backer over the curb, use wet mud. You can kerdi over that.
Thank you Roger. A couple more questions.
1. In each of the corners the contractor folded the liner leaving 3 layers of liner in the corners. Its a bit thick. One corner I was able to remove the nails and tuck the liner into the gap in the corner between the studs. However in the other corners that is not an option. I was thinking of removing the nails, cutting the liner and patching the corner to make it easier to install backer. Thus, eliminating the curved corners that were inevitable.
2. The contractor installed the liner directly over toe nailed boards and the heads of the nails are obvious. Should I hammer in the nail heads to flatten the bumps and patch the holes, or remove the liner and grind off the nail heads? Not sure how much of a problem they will be.
scott
One more. How do you feel about kerdi vs red gard paint on water proofing?
– scott
Hi Scott,
I prefer kerdi, but both work very well.
1. DO NOT (!) cut your liner. You can remove the liner and plane out the front of the two studs about 1/8″, enough to tuck the layers of liner back into them and have the backer flush.
2. Remove the liner and hammer the nail heads to flatten the bumps. DO NOT hammer them through the liner and attempt to patch.
Stop trying to molest your liner, keep it intact.
I have a shower with a single curb on a concrete slab. The curb will be ~2.5″ wide by ~4″ high. Is there a good reason not to just make a form and create the curb from pure concrete?
I am using Kerdi as a waterproofing membrane, so the liner doesn’t need to be under the curb. I was planning on screwing in ~6 tapcons so they protrude upwards from the concrete slab, as well as adding a bonding adhesive to the floor.
You normally don’t want a pure concrete curb because when it cracks (and it will) there is no real barrier between it and the tile, so the grout and tile will crack as well. Using brick is a better option.
That makes sense. What I’m trying to do is to do is try to find something that will allow for a 2.5″ w x 4.5″ h curb (before tiling). If I use a 2″x4″ brick, that means that each side of the curb would only get 1/4″ of mud, which seems a bit thin to me.
Replying to myself… The more I look at how you are doing this, i.e. Stucco coat over the curb base, this might be a viable option for me. Let me know if you think 1/4″ of coverage on the sides is too low.
I’m quite constrained on curb width so that I can comply with shower sizing codes. There is a window in the room that makes getting a 30×30 shower pan a bit tight.
When using kerdi you don’t need to use mud. The kerdi can be bonded directly to the bricks. If you need to build out 1/2″ then just thinset 1/2″ of backer to one side before installing kerdi.
This worked very well. Thanks for the help Roger.
Hey Roger,
Thanks a bunch for this page too. I am using 3 2×4’s to make a curb and have questions that I was hoping you would chime in on.
1. My local big box store only carries Sakrete S-type stucco (not the base coat). When I inquired about using this stuff the Sakrete tech guy said that the compressive strength of stucco was too low and I should use the sand and topping mix – yada yada yada – he couldn’t or (wouldn’t?) tell me if type S stucco would be a suitable substitute – TCNA and all that jazz…We don’t plan on jumping on the darn thing so 900 psi, although low, should be good. I did learn that stucco can vary btwn 900 and 4000 psi. Lowe’s has Sir Mix Concrete 50-lbs Base Coat Stucco Mix (~$13-$14) claims 4000 psi after 28 days but only has a 60 min working time. I thought about mixing stucco from scratch but was not enthralled by the idea of handling the masonry lime. Would you go with Sir mix base coat (out of stock) , the type-S that is in stock, or search elsewhere for another stucco base coat?
2. Assuming I use the correct stucco, it is important in my situation to control the thickness because I want the tile surfaces on the curb’s vertical front side on the same plane as the adjoining drywall. Is half inch a good plan for the stucoo/lath thickness of the vertical sides ?
3. I have a drywall metal corner left after I removed drywall to make room for the backerboard. So at the floor level there is a 1/2″ gap between the studs and the metal drywall corner form (or whatever it is called) and the ends of my curb-forming 2×4’s. My backerboard is only coming down to my top bed – so there is ~ 1/2″ x 3″ x 4.5″ volume of air beside the end of my curb that is outside of the liner. Asuming I don’t want to cut the metal form should I fill this gap with deck mud, wet mud, backerboard, wood, or nothing at all?
4. What should I use to create the pitch on the top surface of the curb for drainage and how much pitch do you use for a curb made from 2×4’s?
5. What do you think the minimum distance between the shower floor by the curb and the inside edge of the top of the curb should be? My curb will be about 5 1/4″ high from the room floor (three 2×4’s plus liner-stucco/lath-thinset and tile) and about 3 1/4″ higher than the shower floor beside the curb. I could remove a 2×4 and make it 1 1/2″ shorter. What would you do?
I know I am probably overthinking this over a beer but…
Hi Gary,
1. The type S will work just fine for your curb.
2. Yes.
3. Deck mud or the stucco mix will work just fine.
4. Just form the stucco mix on top with a slight angle, like 1/16″ higher on the outside than the inside.
5. Minimum height by most building codes require 2″. I would leave the curb as is.
More beer!
Hi Roger.
I was thinking of having bullnose be the top tiles on the vertical sides of my curb, and cut a reglar tile for the top horizontal surface, is that hunky dory?
OR… should we use some of the 1/2″ travertine that we are using for the niche and use that as the top surface with a good edge and not use any bullnose on the curb, that would also eliminate any horizontal lines in the top surface of the curb.
Either one will work.
Yes, that’s just fine.
Roger,
The box stores near me do not stock masonry lime for me to make Fat Mud.
What should I use? Quickrete Mortar Mix or Quickrete type s Mason Mix?
They also have quickrete stucco.
Thanks again. It’s all coming together man! (thanks mostly to your help)
Hi Ross,
Use straight quickrete stucco mix. It makes a good fat mud. Just mix it up according to the directions, nothing more need be added.
Sorry dude, not sure how I missed the enormous picture of stucco mix you provided in the article! This must be why my SAT reading score sucked. Thanks for the info I’ll go grab a bag of that stuff.
I know that I should not use wood on a concrete slab for a shower curb. I have gone to the box stores and can not find brick or concrete blocks in a 4X4 size (length doesn’t matter). Do you have any suggestions? Also is there a reason you did not put your backerboard up before you poured your pan? (after the preslope and the membrane).
Thank you in advance for your help.
Hi Harlan,
Home depot should have pallets of 8x4x2 bricks. Don’t believe I’ve ever seen a 4×4. Double up the bricks to get a 4″ height or depth.
I will not bury my backer in mud if I’m using marble on the wall. Backers can wick moisture up behind the stone, which is no problem with most ceramics and porcelains, but may make the marble or some natural stones darker over the areas of the backer that are consistently wet.
Hi Roger,
Thanks for all of your help so far. I am renovating a shower. Pulled out tub and installing a quickdrain tile shower and currently have the quick drain membrane adhered to the quickdrain foam curb with thinset. Getting ready to install a granite threshold on the curb.
Then ends of the curb are higher than the middle because of waterproofing build-up (kerdi and quickdrain corner pieces). I need approx +1/2″. Can I just thinset kerdi-board or hardi-backer to the membrane/curb to get the correct height? Does this additional substrate need to be waterproofed? Thanks in advance!! — Matt
Hi Matt,
Yes, you can. If you use a waterproofing board like kerdi-board, or a water stable board like hardi, you don’t need to waterproof it. Keep in mind, however, that using hardi or something like it that will soak in water will have a water-soaked substrate beneath your curb in the middle which will flush through regularly (old water replaced with new as the shower is used) may cause color inconsistencies in your stone. The center of your curb may look darker, because there is moisture under it regularly, than do the ends. It would be better to have a topical waterproofing directly under the entire curb.
Now my question: How did you build up curb corners, etc., by 1/2″??? That is incredibly high!
THANK YOU SO MUCH ROGER FOR THIS SITE, I AM REALLY COMFORTABLE WITH DIY PROJECTS JUST AS LONG AS I HAVE THE RIGHT INFO… THIS SITE HAS BEEN A SUPERB PLACE, SO THANK YOU AGAIN SO VERY MUCH FOR ALL YOUR TIME AND EFFORT… AND TO THAT DOG ON FIRE…. DAM IF I HAVEN’T GONE “POOFFF” MYSELF ON OCCASION TOO…LOL….
Shower pan with no curb:
Thanks so much for your quick response! I forgot to mention that we are using redgard and have a divot drain (thanks to your guidance and how to books).
So I assume we can go ahead and add the curb using deck mud and then use redgard over the built up curb?
Again thanks so much!!
Hi Susan,
Yes you can.
I have a shower pan with no curb.
1. Is there any way to add a curb after the shower pan has been poured (with mortar)?
2. Can the curb be molded on the top edge of the pan using mortar? Or, can tile be stacked with thin set and attached to the mortar with thin set?
3. Do we need to cut out a portion of the shower pan and add the 2×4’s after the fact? Is that even possible?
Thanks for your help.
Hi Susan,
Yes, you can add a curb after the fact by simply creating the curb and waterproofing it (*Important), then simply bonding it down with thinset and tiling over it. I’m assuming that your shower floor is properly waterproofed at present, if so that will work just fine. If not then you need to remove the floor about a foot back from the shower and build the curb as you would starting from scratch, waterproof it, then tile, tying the new waterproofing in with the existing.
I would like to use two 3″ bullnose porcelain tiles back to back to make about a 6″ wide shower curb and use cement bricks to form the base structure. The bricks that I’ve found at my big box store are not the right size to allow this. When I stack them in different ways they are either too wide or too narrow. What do you suggest to make the curb base the proper size? Thanks.
Hi John,
Create the curb smaller than you need to, then thinset 1/4″ or 1/2″ backerboard to the sides to get your width.
Anything you can do! All posts are from guys so I thought I would add a female touch, women don’t be scared we do this too! Thanks for the great tips – curb turned out awesome!
Hi Roger,
I’ve poured my pan and curb and it has all cured. I now notice that the front of the curb is recessed about a 1/2″ (max) where the curb and the blue board drywall is, and they need to be flush before I tile the wall and curb. Is there a way to build up the existing curb so that it is flush with the blue board.
I can provide a crude drawing if I’m not clear.
Hi Hugh,
Get some 1/4″ backerboard or kerdi-board and use thinset to bond it to the front of the curb to flush it out. You can put as much thinset behind it as you need to.
Me again. So I’m not sure if a 1/4″ strip of backer board will work. It looks as though the top of the curb is close to 1/4″ recessed from the wall, where the bottom is nearly flush. Any other suggestions? Can I build up on top of the existing deck mud curb?
More thinset under your tile will build it and flush it out to where you need it to be. If you need to use more on the bottom than the top that’s perfectly fine.
Tile is done, now onto the finishing touches. I am having granite people come out to digitally measure and install a curb, small bench as well as surround on the tub. But i have concerns on how they will install it that I want to address when they come out to measure.
1. The shower curb is the kerdi styrofoam, has kerdi over it of course. I will need the curb to be slightly angled. But I have a feeling the install with silicone. Is that suitable for going over kerdi? Or should this be done in thinset? My guess is they will not have thinset so I will have to mix some up and do it with them.
3. The tub surround is an L shape and has hardiboard on it. Will silicone by ok there?
Hi John,
1. It should be done with thinset.
3. Yes.
I have no idea what the hell happened to #2.
Roger,
Regarding question/answer #3 above—attaching granite-to-Hardi tub deck using silicone:
In another post, you had recommended thinset to attach granite to Hardi for a tub deck. Is this a case of either is OK, but maybe thinset is better?
Either is fine, thinset is better.
I’m following your instructions pretty well, but when I built my curb in one corner of the front face, it came out thinner than the rest and not very level. If I hold the tile level, there’s a 1/2″ gap at the top. Can I fill the gap with thinset when I lay the tile or do I need to try to bond more stucco?
Hi Lesh,
The thinset will be fine.
Can I use clay bricks (solid red type) for my curb or do they have to be cement bricks?
Thanks
Hi Al,
Clay bricks are fine.