
This post describes the top, or overlay, of the curb for your traditionally waterproofed shower floor with a liner. The stuff you stick the tile to. It assumes (my posts often assume quite a bit – they are condescending little bastards…) that you already have the curb substrate built, your preslope in, and the liner installed. Those steps are described in the first couple of posts showing you how to build all that stuff here: How to create a shower floor for tile.
First I’ll answer a few questions I get constantly:
NO, YOU CAN NOT INSTALL HARDIBACKER TO YOUR CURB FOR YOUR TILE! (Unless you are using a topical waterproofing method for your shower floor.) There is no way to attach the hardi to your liner without puncturing it, which renders your waterproofing efforts useless. You need to have wire lath over your liner to hold it to the curb and wet mud installed over that to form a substrate for your tile.
Yes, you can use deck mud for your curb if you want to. However, it is not nearly as stable on the sides of your curb. It is not sticky. It may fall off the sides of your curb even after it cures, and take your tile with it. And it may crumble as you work with it after it cures, because you can’t pack it tightly enough to be dense enough on your curb. But yeah, you can use it… ![]()
No, you can not bond tile directly to your liner. No, you can not bond tile directly to your lath. Neither will last. Ever.
When you create your shower floor you are using deck mud. You need wet mud for your curb due to the vertical surfaces. Wet mud is almost identical to deck mud, it just has powdered masonry (or hydrated) lime added to it. A proper wet mud mix is 1 part portland cement, 1/2 – 1 part powdered masonry lime, and 4 parts sand. It is mixed just like deck mud except it needs more water. It should be the consistency of peanut butter (the creamy, not the chunky…)
Powdered lime is nasty stuff! Do not get it on your skin, it itches and burns at the very least and some people have horrible allergic reactions to it causing nasty rashes. Do not breathe it in! Seriously, it’s nasty stuff, handle it with extreme care.

Quikrete stucco base coat
But there is an easier way! I now usually use stucco base coat in place of wet mud when doing smaller areas such as just a curb or bench. It is a very similar mix. Although I don’t know what the exact ratios of the ingredients are it works and cures exactly like my wet mud. It is pre-mixed and bagged and you can find it in the concrete section of any big box store. So I’ll show you how to do your curb using that. Should you choose to mix your own wet mud everything is exactly the same.
Once you get your liner installed and all your dam corners in you need to cut strips of wire lath to fit over your curb. USE GLOVES! Wire lath is sharp and will slice the crap out of your hands! So wear gloves and be careful.
Measure from the liner to the top of the curb, up over the top and down to the floor on the outside of the curb. Subtract an inch from that measurement and this is how wide you want your strips to be. Once you do that cut it the length of your curb.
All the photos I have are of a double curb with a 90 degree angle. If yours is just one curb across the front of your shower it works the same way, but I get a lot of questions about these as well. You can click on any of them for a larger version.

Bent lath for curb

Bent lath for curb
After you get your lath strips cut you need to bend them into a ‘U’ shape. Measure the distance from your liner to the top of your curb and mark that on your lath. That will be your first fold. Fold it all the way over onto itself, not just a 90 degree angle. You want to overbend your lath so that when you put it over the top of your curb it will hold the liner in place.
Your second bend will be the width of your curb away from the first. If you have a 2×4 as your curb just take a scrap 2×4 and place it in the nook of the first fold and fold it around the 2×4. Same works if you’re using bricks. Once folded your lath should look like the photos on the right.
Take the lath and place it tightly over the liner on the curb. You can nail the OUTSIDE of the lath to hold it in place, the deck mud for your shower floor will anchor the inside. DO NOT nail the inside or top of your curb!

Lath wrapped over the curb

Lath wrapped over the curb and corner
The lath should fit snugly against the liner. Overbending it like you did causes it to spring against the liner rather than flapping in the wind. ‘Spring against the liner’ isn’t exactly the best description, but it’s the best I can come up with. Damnit Jim! I’m a tile guy, not a creative novelist!
If your curb is created out of brick you obviously can not nail the outside of it. The spring action (see, now it’s an action and everything…) will hold it in place.
The lath DOES have the ability to puncture your liner! So you need to be a bit careful with it. But you do not need to baby it, the liners are much more durable than you might think. In other words – don’t be afraid to touch the liner with the lath. ![]()
Once it’s in place you have an anchor for your mud so it will stay in place. Once the mud is packed onto the curb it will pack up under the wires of the lath and hold in place. With the outside corner, like this shower, I also cut an additional small piece of lath to wrap around the top of that corner, like the second picture of the lath on the curb.

Properly mixed stucco base
Once your lath is on the curb go ahead and install your top mud deck. That part can be found in Part 4 of creating a shower floor.
Now mix up some stucco base coat. The water ratios on the bag will actually give you about the correct consistency, but begin with a little less water and add a bit more as you mix just to be sure you don’t get it too thin (runny). Again – it should be about the consistency of peanut butter.

Packing mix into the lath
YOU DON’T NEED TO MIX THE ENTIRE BAG! ![]() I just put that there because I know somebody will. You just need enough for the curb. I don’t know how much that is, I can’t see your curb. You can always mix more if you need to.
I just put that there because I know somebody will. You just need enough for the curb. I don’t know how much that is, I can’t see your curb. You can always mix more if you need to.
I use a magnesium mason’s finish float to form and finish my curb (and decks) but you can also use a wooden float or flat trowel if you don’t have one.

(very) rough finish on curb
Once it’s mixed just start by scooping a bunch of it onto the lath. Pack it into the lath well by running your float both ways to ensure it’s embedded beneath the wires of the lath, then start forming your curb. Ideally you want it about 1/2″ thick, but there is no real number for the thickness, so shoot for that. It’s not a big deal if you get it a little thinner or thicker than that. It’s just a guideline.
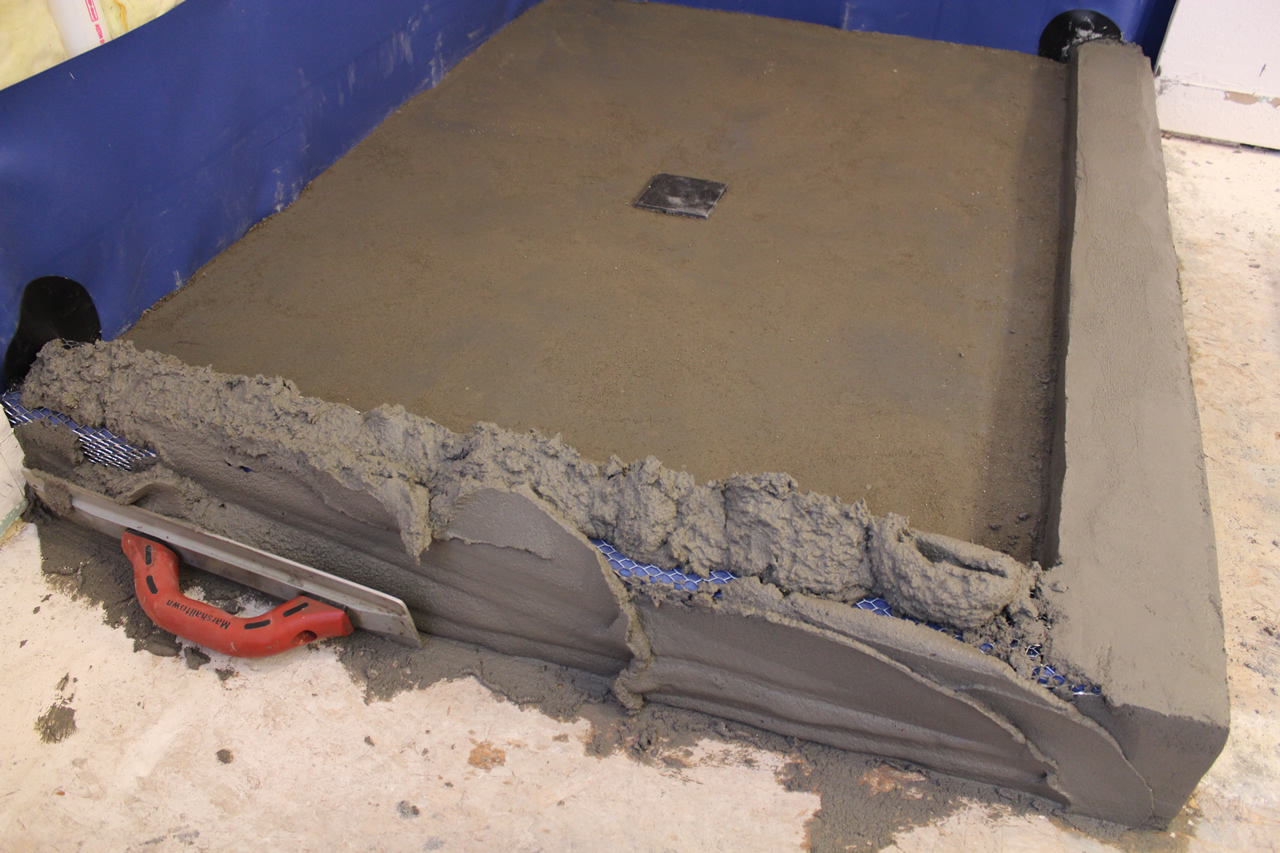
Packing and embedding mud into lath
You want to make sure that every side of your curb is straight (flat). You don’t want them to be wavy. You also want the top to slope slightly into the shower so water will drain into the shower rather than out of it. Your wood or bricks should also be sloped beneath the liner, but you want the tile on top sloped as well to rid the curb of most of the water.

Finished mud on curb
To finish the mix off and get a nice, smooth finish, dip your float or trowel in water and run it down the curb. It will smooth it all out. If you have any rough areas that just seem to get worse the more you mess with it (and you will) – leave it. After it cures you can always sand it down a bit to remove any uneven areas. Just make sure you have enough to sand down – that it’s overbuilt rather than underbuilt.

Finished curb ready for tile
It’s much easier to sand down to get what you need rather than trying to add something to the curb to get it where you need it.
Your curb does not need to be perfect! Oftentimes (typed with my pinkie in the air) the more you mess with it trying to get it perfect, the more you’re gonna screw it up. As long as it is flat (straight) and the top is level and sloped to the inside of the shower you can fix any imperfections after it cures or make up for inconsistencies with thinset as you set your tile.
Once it cures it’s ready for tile. You can bond tile directly to the curb now with thinset, it’s all ready to go.
Now, if you please, a moment of silence for the reader’s dog who burst into flames this morning because he tried to bond tile directly to the liner. You know who you are. And no laughing at him, before you read this you didn’t know how to do it either. (And he IS NOT the first one to do that!).
The dog in question is fine – we just had to snuff him out…
Common Mistakes and Fixes
Completing the entire curb before beginning the waterproofing aspect of the shower floor.
The waterproofing of the curb and the waterproofing of the shower floor are two parts of the same thing. They need to be done at the same time. The correct method is to build the FRAME of your curb only (the 2×4’s or bricks), then install your pre-slope, then the liner while correctly wrapping the liner up and over the curb at the same time, THEN completing your top slope and mud around the curb for your tile substrate. The liner needs to be tied into the curb at the same time, you cannot do that afterwards.
And yes, it HAS to be done – or your shower is going to leak.
Tile and grout are not waterproof. Your curb needs to be.
Using the incorrect material to build your curb.
Use dimensional lumber (regular 2x4s) over a wooden substrate, use bricks over a concrete substrate.
That’s it. Period.
NEVER, NEVER, NEVER use pressure-treated lumber. PT wood DOES NOT like dry installations. Provided you waterproof your curb correctly, that’s a dry environment. It will begin to LOSE moisture. When that happens it will shrink, twist, and do all sorts of weird foreign dances beneath your tile.
Tile doesn’t like that.
It will crack the grout, and may crack the tile as well.
Incorrect slope, or no slope at all.
The top of your curb needs to be sloped toward the inside of the shower. If it isn’t water may sit on top of it (best case scenario), or water will simply pour OUT of your shower. The easiest way to do this is while layering your 2x4s for the frame, place a drywall shim on the outer edge between two of them. If using bricks over concrete simply place a bit more thinset on the outside edge of the shower than on the inside. It doesn’t need to be sloped much, but it needs to be sloped. 1/8″ is plenty.
Frequently Asked Questions
Can I build a curb without the liner
Not if you are building your shower floor with a liner. There is no way to properly tie any sort of waterproofing into it, even with a topical waterproofing membrane. (There are exceptions, but very few)
What’s the correct curb height?
The minimum height of a shower curb is no less than 2″ above the finished height of the top of the drain. For a 3×5 shower three normal 2x4s is usually sufficient. That makes the outside of your curb 4 1/2″, and the inside ~1 1/2″, and meets the minimum height requirement. This is “normal”, but you can make it as low or high as you want, provided you meet that 2″ above the drain code.
Can I fix a leaking curb without tearing out the shower?
Maybe. I know that answer sucks, but it’s the truth. It can normally be repaired without intruding too much on the shower floor IF the liner is not compromised. The biggest problem is that the reason it’s normally leaking is because the liner is compromised. You’ll need to remove all the tile on the curb to figure out WHY your curb is leaking. Every leak is different, so there isn’t really one specific answer. You can ask about your particular scenario in the comments below and I can normally tell you what’s required to repair your shower.
What’s the best material for the curb?
There are currently several different prefabricated curb product, however, most of them are for topical membranes (kerdi, hydroban, redgard, etc.). There are a few you can use with a liner, but they are difficult to find, and a LOT more expensive than wood or bricks and wet mud. If you have one available you can absolutely use it. They work just fine provided you follow the correct installation procedures.
Related Posts
How to make deck mud
How to build a bench for your shower
How to create a shower floor


Can you use a “curb over” product over your 2×4 curb and pvc liner? If you only put screws through the outside? I’m thinking like the Wedi Curb Over (https://www.masterwholesale.com/wedi-curb-over-form-us3000008.html) to eliminate the lathe and stucco step? I’m using wedi BC on the walls with a mud pan. Thanks.
Hi Lisa,
Absolutely you can! Those products are ideal for that application.
We had shower built with no door..now water is accumulating on curb and running out opening. Everything is tiled and shower glad is installed. What can be done?
Hi Ed,
It sounds like the curb is improperly sloped, or not sloped. The top of it needs to be sloped toward the drain. Your curb can be rebuilt, but depending on how everything is constructed that may be a much larger job than you think.
I have been studying shower bench seats and have all my answers on how to wire lath them for a mud job except one.
How do I attach the wire lath to the hot mop on the “Vertical Face” of the bench.
I could use as few fasteners as possible but it will still penetrate the hot mop waterproofing.
Thanks
Hi Billy,
You can put it up there with small dabs of silicone or adhesive. Once the mud is cured it simply gives a reinforces the mud, it doesn’t hold the mud to the bench.
Got it!
Job is till coming up so good timing on the response.
Thanks
Water accumulating on shower curb next to glass shower panel and running toward doorless opening. How do I correct this?
Hi Rali,
The curb needs to be rebuilt, it’s obviously sloped the wrong way.
Is it my breath? All my comments and questions keep disappearing. I wonder with the bits that keep the weep holes from getting clogged. Do they get mortared in during the top floor to remain forever?
Hi Margaret,
I have answered two or three of your questions, I’m unsure if others have ‘disappeared’, it hasn’t been an issue as far as I know. As to your breath – I have no idea, it isn’t an issue from this side of the internet.
Yes, the pea gravel that you use to keep the weep holes open get covered in with deck mud. They should be embedded into your mud deck, they should not even ever touch mortar.
I’m a bit confused by your wording. “Do they get mortared in during the top floor…” Do you mean during tile installation? In which case they should already be covered. Or do you mean during the top mud deck installation, in which case they get covered and embedded into the deck mud.
For lack of choices I used the regular hydrated lime from the feed store with no letter designation in the recipe with the Sand and Topping mix. It was brilliant. It sticks on a vertical. I’m waiting for it to dry to see if the quality suffered. Will report my findings
Regular lime works fine. For walls and margaritas.
Question: There are building material shortages here right now. I can not get the Stucco base mix and I can not find Type S Masonry Hydrated lime. I can get regular Hydrated lime letter type unknow at the local feed store. Is that adequate to make Fat Mud?
Hi Margaret,
Yes. WEAR GLOVES! Seriously, that shit burns.
Wow I am glad I found this. I’ve been searching for Type S Masonry Lime. It was like looking for the Holy Grail. Now I can just go get the stucco mix! YAy!
I am removing the cheap shower pan and doing tile. I have a concrete floor so I will be doing a curb with concrete blocks. I will be using a topical waterproofing membrane to seal it all up. Can I just seal up the blocks and tile on top of those or do I need to do anything special?
Hi Tommy,
Yes, you can do all that directly to the bricks.
Ok the lime didn’t work so I got Stucco base coat from Lowes. They didn’t have quikcrete brand so i got another brand. It sucked. It didn’t stick well and kept crumbling and falling apart. It had a lot of lime I know because it burned my hands. The nearest place I’ve found to buy the lime is 75 miles away. It should have to be this hard.
You need a lot of water, too.
Thanks for taking time. Your answers just showed up on my computer today. It is the devils in the box I guess. I tried regular hydrated lime from the feed store and the finished product was so fragile you could touch it and it fell apart. I tried the Stucco base mix from Lowes and it wasn’t sticking to the 2X4s/wire It was hugely hard to use and finally began to sag and fall off the vertical faces so I took it all off, cleaned everything and will start again soon. I did find some type S hydrated lime available an hour’s drive away so I’ll go get that stuff and try again. So you’re saying my store bought stucco base mix only needed more water than I used to make it adhere better?
Loves your tips, super fragilistic expialidocious helpful.
Today’s question. I’m redoing my shower, I left in the existing plastic pan – it’s in great shape and I didn’t want to deal with it. The question is can I line to outside (floor side) face and top with tile, leave the inside face as it is and then install a sliding shower door? Or after doing this doe s the door proceed to crack the tile?
Or is this just a plain dumbass idea?
Hi Peter,
The door won’t crack properly installed tile. However, bonding to the acrylic is an issue as the two materials (acrylic and ceramic) expand and contract at different rates leading, eventually, to a failed bond. It normally will not bond long-term to acrylic.
Thank you for such a great site. After adding tile & grout, where would you caulk? Specifically would you caulk the edge of curb? Or just top, bottom, and sides?
Hi Debra,
Top, bottom and sides. Any inside corner or change of plane.
Hi Roger- thanks for the great site!
Installing large format tiles on the shower wall ,vertically.
Can you help me with which order the tiling should be done?
For the following
Floor, wall and ceiling tiles.
And is it better to install shower saddle before or after tiling the wall?
Hi Mo,
I do the floor first, then the walls up to the last row (leave it out), then the ceiling, then the last row on the walls. I normally put the saddle (I assume you mean the top of the curb) in before the tile walls.
I built a brick curb on a cement floor using your method above. It all went pretty well. The slope and curb aren’t as perfect as I hoped (I’ve got enough slope and it’s going the right way just not as flat and uniform as I’d like) but I’m hoping I’m being too self critical, I’m trying to let go.
Question: You can’t puncture the PVC liner with screws or nails on the top or inside and that makes sense to me. However, my curb is 60 inches long and I want to install a glass “wall” or “wall plus door” on it. How do I mount the brackets that will hold the glass panel for the wall/door if I can’t screw anything onto the top of the curb?
Hi Mike,
Most installers have brackets that will hold the glass panel from the wall only. If you do need a stabilizing bracket underneath (on top of the curb) then a hole CAN be drilled through the curb, filled with silicone, then the screw is inserted. If AT ALL possible just have the bottom bracket siliconed to the top of the tile. That is normally more than enough to hold it in place provided the wall brackets are installed correctly.
Hello,
I am torn between building a shower with the traditional method (pan liner) or the more modern ways of using a waterproofing membrane on top of the mortar bed. So, would it be an issue to build the shower with the pan liner below the mortar bed and install a waterproofing membrane on the shower curb and corners ONLY (but not across the entire shower bed)? Would this still be an issue with mold on the corners even though the rest of the mortar bed would only have the liner below?
Hi Wendy,
You have to do one or the other. The biggest problem is that deck mud will wick water. That means that once water gets into the mud and to the liner it can wick back up through the mud UNDER the topical waterproofing on the curb or into the corners.
Thanks Doc!
Victim of my own overzealous application of adhesive more years ago than I care to recall. Don’t know why heating didn’t occur to me – at least two serious heat guns on the premises. It’s only a very small ~4’x6′ area of floor – shower area isn’t affected. Will try heat and rough sanding to help adhesion. And rely on large tiles and sealed grout with minimal water exposure to minimize post install issues.
Many thanks for the two cents! Appreciated. -C. Squire