
This post describes the top, or overlay, of the curb for your traditionally waterproofed shower floor with a liner. The stuff you stick the tile to. It assumes (my posts often assume quite a bit – they are condescending little bastards…) that you already have the curb substrate built, your preslope in, and the liner installed. Those steps are described in the first couple of posts showing you how to build all that stuff here: How to create a shower floor for tile.
First I’ll answer a few questions I get constantly:
NO, YOU CAN NOT INSTALL HARDIBACKER TO YOUR CURB FOR YOUR TILE! (Unless you are using a topical waterproofing method for your shower floor.) There is no way to attach the hardi to your liner without puncturing it, which renders your waterproofing efforts useless. You need to have wire lath over your liner to hold it to the curb and wet mud installed over that to form a substrate for your tile.
Yes, you can use deck mud for your curb if you want to. However, it is not nearly as stable on the sides of your curb. It is not sticky. It may fall off the sides of your curb even after it cures, and take your tile with it. And it may crumble as you work with it after it cures, because you can’t pack it tightly enough to be dense enough on your curb. But yeah, you can use it… ![]()
No, you can not bond tile directly to your liner. No, you can not bond tile directly to your lath. Neither will last. Ever.
When you create your shower floor you are using deck mud. You need wet mud for your curb due to the vertical surfaces. Wet mud is almost identical to deck mud, it just has powdered masonry (or hydrated) lime added to it. A proper wet mud mix is 1 part portland cement, 1/2 – 1 part powdered masonry lime, and 4 parts sand. It is mixed just like deck mud except it needs more water. It should be the consistency of peanut butter (the creamy, not the chunky…)
Powdered lime is nasty stuff! Do not get it on your skin, it itches and burns at the very least and some people have horrible allergic reactions to it causing nasty rashes. Do not breathe it in! Seriously, it’s nasty stuff, handle it with extreme care.

Quikrete stucco base coat
But there is an easier way! I now usually use stucco base coat in place of wet mud when doing smaller areas such as just a curb or bench. It is a very similar mix. Although I don’t know what the exact ratios of the ingredients are it works and cures exactly like my wet mud. It is pre-mixed and bagged and you can find it in the concrete section of any big box store. So I’ll show you how to do your curb using that. Should you choose to mix your own wet mud everything is exactly the same.
Once you get your liner installed and all your dam corners in you need to cut strips of wire lath to fit over your curb. USE GLOVES! Wire lath is sharp and will slice the crap out of your hands! So wear gloves and be careful.
Measure from the liner to the top of the curb, up over the top and down to the floor on the outside of the curb. Subtract an inch from that measurement and this is how wide you want your strips to be. Once you do that cut it the length of your curb.
All the photos I have are of a double curb with a 90 degree angle. If yours is just one curb across the front of your shower it works the same way, but I get a lot of questions about these as well. You can click on any of them for a larger version.

Bent lath for curb

Bent lath for curb
After you get your lath strips cut you need to bend them into a ‘U’ shape. Measure the distance from your liner to the top of your curb and mark that on your lath. That will be your first fold. Fold it all the way over onto itself, not just a 90 degree angle. You want to overbend your lath so that when you put it over the top of your curb it will hold the liner in place.
Your second bend will be the width of your curb away from the first. If you have a 2×4 as your curb just take a scrap 2×4 and place it in the nook of the first fold and fold it around the 2×4. Same works if you’re using bricks. Once folded your lath should look like the photos on the right.
Take the lath and place it tightly over the liner on the curb. You can nail the OUTSIDE of the lath to hold it in place, the deck mud for your shower floor will anchor the inside. DO NOT nail the inside or top of your curb!

Lath wrapped over the curb

Lath wrapped over the curb and corner
The lath should fit snugly against the liner. Overbending it like you did causes it to spring against the liner rather than flapping in the wind. ‘Spring against the liner’ isn’t exactly the best description, but it’s the best I can come up with. Damnit Jim! I’m a tile guy, not a creative novelist!
If your curb is created out of brick you obviously can not nail the outside of it. The spring action (see, now it’s an action and everything…) will hold it in place.
The lath DOES have the ability to puncture your liner! So you need to be a bit careful with it. But you do not need to baby it, the liners are much more durable than you might think. In other words – don’t be afraid to touch the liner with the lath. ![]()
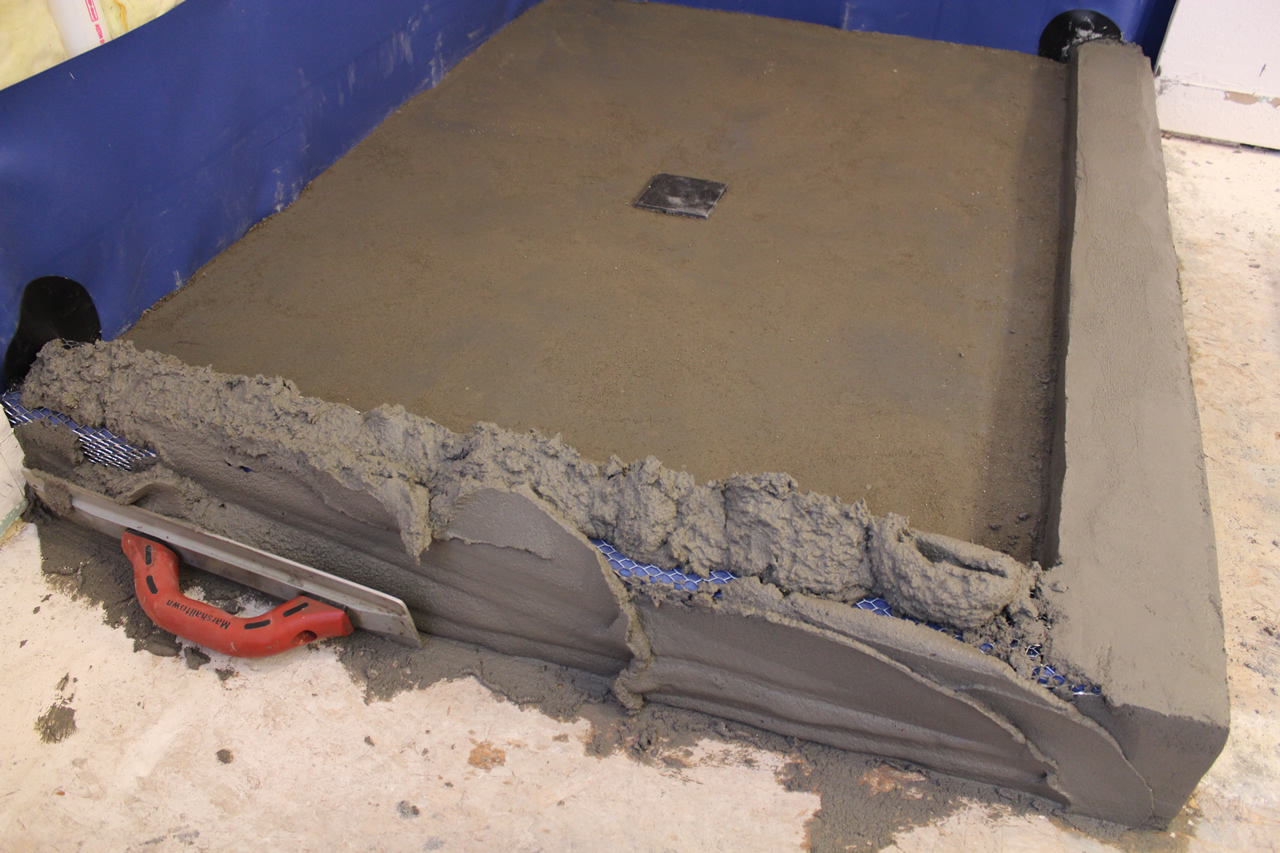
Once it’s in place you have an anchor for your mud so it will stay in place. Once the mud is packed onto the curb it will pack up under the wires of the lath and hold in place. With the outside corner, like this shower, I also cut an additional small piece of lath to wrap around the top of that corner, like the second picture of the lath on the curb.

Properly mixed stucco base
Once your lath is on the curb go ahead and install your top mud deck. That part can be found in Part 4 of creating a shower floor.
Now mix up some stucco base coat. The water ratios on the bag will actually give you about the correct consistency, but begin with a little less water and add a bit more as you mix just to be sure you don’t get it too thin (runny). Again – it should be about the consistency of peanut butter.

Packing mix into the lath
YOU DON’T NEED TO MIX THE ENTIRE BAG! ![]() I just put that there because I know somebody will. You just need enough for the curb. I don’t know how much that is, I can’t see your curb. You can always mix more if you need to.
I just put that there because I know somebody will. You just need enough for the curb. I don’t know how much that is, I can’t see your curb. You can always mix more if you need to.
I use a magnesium mason’s finish float to form and finish my curb (and decks) but you can also use a wooden float or flat trowel if you don’t have one.

(very) rough finish on curb
Once it’s mixed just start by scooping a bunch of it onto the lath. Pack it into the lath well by running your float both ways to ensure it’s embedded beneath the wires of the lath, then start forming your curb. Ideally you want it about 1/2″ thick, but there is no real number for the thickness, so shoot for that. It’s not a big deal if you get it a little thinner or thicker than that. It’s just a guideline.
Packing and embedding mud into lath
You want to make sure that every side of your curb is straight (flat). You don’t want them to be wavy. You also want the top to slope slightly into the shower so water will drain into the shower rather than out of it. Your wood or bricks should also be sloped beneath the liner, but you want the tile on top sloped as well to rid the curb of most of the water.

Finished mud on curb
To finish the mix off and get a nice, smooth finish, dip your float or trowel in water and run it down the curb. It will smooth it all out. If you have any rough areas that just seem to get worse the more you mess with it (and you will) – leave it. After it cures you can always sand it down a bit to remove any uneven areas. Just make sure you have enough to sand down – that it’s overbuilt rather than underbuilt.

Finished curb ready for tile
It’s much easier to sand down to get what you need rather than trying to add something to the curb to get it where you need it.
Your curb does not need to be perfect! Oftentimes (typed with my pinkie in the air) the more you mess with it trying to get it perfect, the more you’re gonna screw it up. As long as it is flat (straight) and the top is level and sloped to the inside of the shower you can fix any imperfections after it cures or make up for inconsistencies with thinset as you set your tile.
Once it cures it’s ready for tile. You can bond tile directly to the curb now with thinset, it’s all ready to go.
Now, if you please, a moment of silence for the reader’s dog who burst into flames this morning because he tried to bond tile directly to the liner. You know who you are. And no laughing at him, before you read this you didn’t know how to do it either. (And he IS NOT the first one to do that!).
The dog in question is fine – we just had to snuff him out…
Common Mistakes and Fixes
Completing the entire curb before beginning the waterproofing aspect of the shower floor.
The waterproofing of the curb and the waterproofing of the shower floor are two parts of the same thing. They need to be done at the same time. The correct method is to build the FRAME of your curb only (the 2×4’s or bricks), then install your pre-slope, then the liner while correctly wrapping the liner up and over the curb at the same time, THEN completing your top slope and mud around the curb for your tile substrate. The liner needs to be tied into the curb at the same time, you cannot do that afterwards.
And yes, it HAS to be done – or your shower is going to leak.
Tile and grout are not waterproof. Your curb needs to be.
Using the incorrect material to build your curb.
Use dimensional lumber (regular 2x4s) over a wooden substrate, use bricks over a concrete substrate.
That’s it. Period.
NEVER, NEVER, NEVER use pressure-treated lumber. PT wood DOES NOT like dry installations. Provided you waterproof your curb correctly, that’s a dry environment. It will begin to LOSE moisture. When that happens it will shrink, twist, and do all sorts of weird foreign dances beneath your tile.
Tile doesn’t like that.
It will crack the grout, and may crack the tile as well.
Incorrect slope, or no slope at all.
The top of your curb needs to be sloped toward the inside of the shower. If it isn’t water may sit on top of it (best case scenario), or water will simply pour OUT of your shower. The easiest way to do this is while layering your 2x4s for the frame, place a drywall shim on the outer edge between two of them. If using bricks over concrete simply place a bit more thinset on the outside edge of the shower than on the inside. It doesn’t need to be sloped much, but it needs to be sloped. 1/8″ is plenty.
Frequently Asked Questions
Can I build a curb without the liner
Not if you are building your shower floor with a liner. There is no way to properly tie any sort of waterproofing into it, even with a topical waterproofing membrane. (There are exceptions, but very few)
What’s the correct curb height?
The minimum height of a shower curb is no less than 2″ above the finished height of the top of the drain. For a 3×5 shower three normal 2x4s is usually sufficient. That makes the outside of your curb 4 1/2″, and the inside ~1 1/2″, and meets the minimum height requirement. This is “normal”, but you can make it as low or high as you want, provided you meet that 2″ above the drain code.
Can I fix a leaking curb without tearing out the shower?
Maybe. I know that answer sucks, but it’s the truth. It can normally be repaired without intruding too much on the shower floor IF the liner is not compromised. The biggest problem is that the reason it’s normally leaking is because the liner is compromised. You’ll need to remove all the tile on the curb to figure out WHY your curb is leaking. Every leak is different, so there isn’t really one specific answer. You can ask about your particular scenario in the comments below and I can normally tell you what’s required to repair your shower.
What’s the best material for the curb?
There are currently several different prefabricated curb product, however, most of them are for topical membranes (kerdi, hydroban, redgard, etc.). There are a few you can use with a liner, but they are difficult to find, and a LOT more expensive than wood or bricks and wet mud. If you have one available you can absolutely use it. They work just fine provided you follow the correct installation procedures.
Related Posts
How to make deck mud
How to build a bench for your shower
How to create a shower floor


I have used a heat gun to soften the mastik or glue and along with a long handled 4″ razor scraper (harbour freight ~$10), I was able to remove enough of the brownish adhesive, at least past the notched trowel blotches, that I was left with %80-90 wall and flat discolored, roughened glue rem.
FYI – Schluter systems newest poly modified thinset is ideal for substrate/tiling when adhering two impervious substrates together. Schluter originally only recommended unmodified thinset which is getting harder to find and perhaps not as good as the forever new and improved mixes. Reason being, their membrane or kerdi board (waterproof) and the tile (waterproof) do not allow for other modified thinsets to dry sandwiched between the two. The new “super-schluter” chemically cures. If you are worried about thinset curing over leftover glue bed, consider super-schluter as an option after the above heat gun treatment and an 80 grit belt sander prep.
The market also offers tile over tile paint on primer to prepare old tile to be tiled over. I often use this over a few coats of redguard, just to make sure it’s water proof and rough enough to bond to.
My $0.02 any.
~Dr Colg8
Hi roger,
I’m building a shower curb and is it ok to use quikcrete type n mortar. Or is it not sticky enough?
Also it looks like you put the the walls on after you have finished making the shower floor. Is this typical or is it ok to have walls on then pour the final layer of mortor?
Hey Roger.
im building a shower in a basement bathroom. the whole floor is getting a mudd job(putting radiant heat in the rest of the bathroom.
my plumber mentioned building a curb, water proofing it and than he will install the shower pan, and than we tile over the curb and the shower floor
does this sound right to you or is there a better way of doing it? what would actually be the very first step, build the curb straight onto the basement cement floor?
thanks
dave
Hi Dave,
Yes, I would build the curb first and install it directly to the slab. Your plumber is correct – and I don’t say that often.
Roger,
how would i build a curb the same width as a studwall? would i use 2×3 studs with the same process?
Over a wooden substrate a 2×4 with 1/2″ substrate on each side of it. That will give you 4 1/2″, the normal depth of a wall.
I have a question about my shower curb that a company is in the progress of completing and it’s not square. The shower is wider by an inch from one end to the other making the curb slightly diagonal. My concern is mounting a semi framed barn door style glass door. If the glass is to follow the curb(in a straight line)and the upper door track/rod end brackets are mounted into the square walls won’t this be an issue lining up the rod with brackets without having to tweak the rod to fit into said brackets?
Hi Vic,
Yes, it will be an issue. The opening (at the very least) where the shower door is installed has to be square. While a little bit can be compensated for (up to MAYBE 1/4″), a full inch is unacceptable.
Hey Roger,
I am a big fan of your website!!! I have a question on picture #17 in the “FLAWED” section of your website.”Seriously incorrect curb waterproofing technique” (this is the notation under the picture that you wrote). My question is: What was wrong with the waterproofing of this curb? Why it is not OK to have the membrane inside the concrete curb? Could you point the flaws of this approach?
Thank you very much,
Hi George,
This technique used to be accepted practice, and for the most part worked perfectly fine. The problem is that the waterproofing sits about an inch below the top of the curb, which means that water on top of the curb could absorb down through the mud in either direction – in or out of the shower. Once that ‘water line’ is established the water will continue to run in that direction every time. So while it worked (mostly) it was an absolute coin flip that decided whether the water would stay inside the shower or leak to the outside. If it leaked to the outside it would often soak down into the substrate below the curb and into framing, etc. absolutely destroying the structure beneath the bathroom floor, often long before any visible signs of leaking water or damage was visible.
Hey Roger,
Thank you very much for your answer! It makes sense. I have follow up questions:
1. Do you think if they had put red-guard over the entire curb the result would have been different?
2. In general, is it OK to put red-guard over the entire shower floor built under the traditional model – “Just in case” if cost is not a consideration. Or perhaps cover with red-guard some areas on the floor (corners, the area under the shower where the water hits the tiles)?
3. Under your model described above – is it a good idea to put steel lath on the entire floor, not just the curb?
4. Under your model – should I put some silicone/redguard between the durock and the floor before I put the tiles or maybe push the floor tile under the durock all the way to the vertical piece of the membrane?
Thank you very much,
1. Maybe
2. No. It will create a damp layer (mud bed) between two waterproof layers (liner and redgard) and it will grow mold. ‘Just in case’ normally does two things: 1. Creates more problems that did not exist and 2. Declares that whomever is building the shower does not have confidence in their ability to waterproof a shower using a proven method
3. Yes
4. No. Why would you do that? It’s not necessary.
Thank you very much! Your comments were very helpful!
Ooooo, I’m glad I read this comment. I was about to “Just in case” the entire shower with Redguard and “create a damp layer that grows mold” makes sense to me. But now I’m thinking of the damp layer of mud bed (pre slope) between the cement floor and the liner. Why is that different? I guess the cement floor isn’t waterproof.
Thanks to your doc (Traditional_floor_topical_wallboard) I do have confidence in my liner so I’ll definitely forego the Redguard on the floor. But since I did buy a bucket and had it too long to return, I may use it on Denshield seams and to “just in case” the screws on the Denshield, that should be OK yes?
Hi Mike,
Yes, using the redgard in those areas is completely fine. The reason the issue with the water in the preslope is different is that concrete cures through hydration, which means the that individual hydrogen and oxygen molecules are seperately utilized in the curing of the concrete. The issue with the ‘mold sandwich’ isn’t from water in the mud mix, it is from external vapor and water that may get under the redgard, normally at the drain through the weepholes or any other area where water (or vapor) can penetrate. Once the concrete is cured the water molecules no longer exist in that form in the mix itself.
Hey there Roger,
I have a question about installing a curb in a finished curbless walk in shower. Is it necessary to do pull up existing floor tiles to affix the curb to the substrate or is there a way of installing it over the old tiles and then tiling over it and blending it in.
Hi Chris,
The problem isn’t fixing the curb to the existing tile, you just have to scuff up the tile and thinset the curb to it (foam curb) or drill holes through it and install a curb. The issue is tying the new waterproofing on the curb into the existing waterproofing. Although it obviously drains correctly, so *technically* that doesn’t need to be done. But it’s always best.
Hi,
I am building a shower on concrete slab…back wall is concrete block, end walls are wood stud framed, shower is approx 6ft wide, 4ft deep…door opening is 30″ on the 6ft side…I wish to have a half wall approx 3ft high by 42″ long for a 6ft total length. Should I make the door curb using brick? And the half wall using brick or should it be a stud wall?
Hi Mark,
Yes, you should make the curb out of bricks. You can do the 1/2 wall with either, but the framed wall would be much easier. You DO need to construct it correctly with a treated stud anchored to the slab, then you can use regular kd lumber above that. There are a lot of youtube videos about it.
Thank you, I have indeed viewed many you tube videos…almost all show constructing the curb using 2×4 lumber, and they also show laying the pan liner PVC on a flat floor, I just know why these videos show substandard construction…even the talked about great construction videos show similar methods, it makes me think about you saying there are good installer out there. I will indeed use bricks & lath, mud. Thanks again.
I notice that you did the top layer of mud before installing backerboard on the walls. Is that what you recommend? I have seen some places recommend installing the backerboard first, such that it’s embedded in the top layer of mud. I can’t think of a particular reason why one would be better than the other, just wondering. Thanks.
Actually I take that back – I can think of one reason to *not* embed CBU / backerboard into the top mortar layer – wicking. My understanding is these things can and do wick water, and you don’t want it wicking up the wall. This is why a gap is recommended between the backerboard and the pan. It seems like this should be an actual air gap; and not have mud in it, as the mud itself also wicks moisture. Thoughts?
Yes, you’re correct. I read comments in the order they are typed, it’s backwards.
Fun, right?
Hi John,
If you’re doing a topical waterproofing you can bury the cement board in the mud. If you’re doing a traditional waterproofing you want a gap between the two. Cement backerboard will wick water up the wall if constantly exposed at the bottom. If there’s a gap gravity will allow it to drain down and dissipate from the board.
Yes, water will travel up a wall. Fun, right?
Hi, Roger — I’m redoing my guess bath. “Contractors” demoed the one piece tub shower combo down to studs, broke drain pipe in the process, and decided it was too much work and walked away. Cannot find contractors to complete the job due to all of the work for them from hurricane damaged homes. I have decided to complete it myself. I’m scared but willing since I really have no other choice if I want it completed before the end of the world. I have a question about building the curb. Slab floor, using bricks and thinset to stick them to floor and each other, then stucco base to make the rest of the curb. Do I have to use lath for the curb or can I use something like leftover window screen that I have in the garage? I’m using RedGard for waterproofing.
Hi Veronica,
It needs to be wire lath so the stucco base has a proper substrate to grab onto.
SOS, Thanks to your explanation I know now how to deal with the shower curb without puncturing the liner. Can I do the same with the shower bench (after the liner, of course). If I Put the Cement boar, tape it and Redguard it, I’m afraid it will not be strong enough, so mesh, them mud, thinset and finally tiles. Will it work?
Thanks!
Hi Sofia,
It will be more than strong enough either way. They will both work fine.
Roger,
will use two by for to build up shower curb as glass will be installed after tiling. I want to use marble on shower curb that forms 90 degree angle instead of the tile to eliminate grout lines under glass. my concern is the miter joint. how should I join the mitered ends at the 90? Do I leave a gap and grout or use adhesive between and join the two when setting them and silicon after it sets? do I need to use something to hold the two pieces together to keep them tight until they set? Or is there another (better) method? Thanks
Hi Joseph,
If you can get epoxy used with natural stone to bond the two that will be fine (like the stuff used on countertops). If not, that’s fine as well. You just need to ensure your curb tops are absolutely flat to one another and install the marble. I normally leave about 1/32 between the two and grout or silicone that space. You can just use tape to keep the pieces together relative to one another until the thinset cures.
Roger,
I’m fixing a failed attempt at an even shower curb. A friend helped and now it’s 5 1/2″ wide in the corner and only 5 1/8″ at the edge.
I’ve been advised to spread thinset over it to help bond and then build it up with wet mud.
I’ve wondered if I should chip away some curb to allow a thicker wet mud addition. Help.
Thanks for the good info here.
Hi Michael,
You don’t need to chip away, wet mud can be solid in thin layers as well. Just spread thinset on it and even it out with more wet mud.
That is a real blessing. I’m off to get some stucco mix first thing tomorrow. God is good and you’ve been a great help. Thanks.
Hi, Roger. I found your website when I was looking into shower curbs. I then spent an inordinate amount of time looking around your site for other tile-related info. Here’s where I am … we have a contractor who will be doing a ton of tile work in our house this year, including two showers and kitchen backsplash. He has done a few jobs for my parents, which says a lot to me. My stepfather won’t ask you back unless you meet his expectations. That vote of confidence should be enough for me, but because I have anxiety issues, I worry about things like … well … does he REALLY know what he’s doing. So, my question is this – how do you know that your general contractor is TRULY qualified to do all the tile work in your home? You may be wondering why I, the client, was looking into shower curbs online. Again, it’s the freakin’ anxiety. As if reading up on shower curbs will allow me to be able to tell if my GC is doing it properly! I’m an idiot … an idiot with anxiety. Thanks for any insight you may have.
Hi Tiffany,
You could maybe talk to him. Ask him questions, any contractor that knows what he is doing has no issue at all describing what or why something is being done a certain way. Just ask. I can put people to sleep talking about tile.
It’s not life or death – it’s a shower. Relax. Trust that someone is a professional – there are many of us out there.
Thanks, Roger. Seriously. So far he’s been easy to talk to, so I will just be honest with him that I sometimes need a little more information. I appreciate your reply!
Roger,
Please help me out with a dilemma that put my project on hold. You’ll see from the photos the size of the curb I’ve constructed. My redgarded front side of the curb(not the one you’ll see in the photos) was the thickness of a 2×4 shy of being flush with the wall you see on the left side of the photos. Faced with the uncertainty of how I could finish that I proceeded to add to the curb so that as you see in the photos, the front face of the curb is now flush with that wall. What are your honest thoughts? Is it too wide? Should I rip it out and start again? How would you finish it off? My intention was to do floor tile and tile for the shower. I was not intending on doing any wall tile in this bath. Should I do a floor moulding on the wall that extends from the door to the end of that wall and if so how would you approach finishing on the corner where the curb meets the corner? Please let me know if I am not being clear. Any and all suggestions on how to finish this thing would be greatly appreciated! This was to be a 6 week or so project that has dragged on for way too long. Aside from what I’ve shared here the other big hangup I have is defining tile scheme. I’ve found it to be one of the hardest parts of the job!
-Mark
And now a pic or two…
**
I’d love to share the photo(s) if I could only figure out how…
One more try at picture uploads…
Hi Mark,
Not sure what the hell is going on with my photo uploads, but you can email it to Roger@FloorElf.com. I’m gonna need the pic to help, I can’t really visualize what you’re asking without it.
Done
Hi Mark,
I think Ryan nailed every answer I would have given you with his first response. Same advice I would have given you.
I have a question concenring the curb itself. It will basically be 2×4’s stacked. Is it preferable to double up the plywood floor completely then build the curb or build the curb and then double up the floors seperatley (shower and rest of bathroom). Or am I just overthinking this and it doesn’t really matter? Thanks!
Hi Marc,
You’re overthinking it. It doesn’t matter. Just make sure that you have the correct height you want above the second layer of ply regardless of which method you use.
Roger,
I see a comment to not use mortar mix for the curb. My local box store does not carry the stucco quikcrete product you recommend. When I look at the components of type s mortar mix on the web, it says, “Type S contains 2 parts portland cement, 1 part hydrated lime and 9 parts sand”. This seems to be very close to the mud mix for the pan floor, but with lime added. That seems to make it the same as the stucco quikcrete product. I find a type s mortar mix at lowes and a type s masonry cement at lowes. Maybe they’re the same. What am I missing? thanks
Brad
Hi Brad,
Lime makes it sticky so it stays on vertical surfaces (the sides of the curb). You can mix up deck mud at a 5:1 portland to sand and add 1/2 ratio of masonry lime to it. Same thing. Products like this are simply premixed and bagged for convenience.
Roger, thank you for the very detailed tutorial. My shower floor and curb came out perfect. It’s now ready for tile. Appreciate the time you took to teach us and share your knowledge.
The curbside is built. What product do you use to cover curb? Is Corean the only product that can be molded to cover three sides w/o showing grout lines.
If I need to grout three sides for curbsides, how do you do it?
Hi Billie,
The only one I know of. And I’ve never seen it done. You grout it just like you would any other piece of tile in the shower. I’m not really sure what you’re asking.
Hi Roger, I just wanted to say thank you so much for your insight. I have been dreading this project, and with your knowledge, it has made it all so so much easier!!
One quick question. I am having issues with the lath. The lath wasn’t perfect sitting on the brick/pvc base, but I assumed (yeah big mistake), that I would be able to mold the lath into place with the stucco cement. I put my stucco cement onto the curb, and found the lath to almost “float” in it, so now as the stucco dried, the lath is visible. The actual cement is approx 1/2 -3/4. With your expertise in this area, how can I un-screw this problem? should I add a second thin coat, leave it and fix any imperfections with thin set (the curb will be covered with marble pieces), or break it up, re bend the lath, and try for round two?
Thanks for everything. Your website is invaluable. I will buy your instruction manual just to thank you, and add to your beer fund.
OK, I asked about this on your mud for pans blog but did not receive an answer so will try here as it is a little related. I purchased my Portland cement and sand before finding you and buying your books. Anyway, I made my slope 5:1 over lathe over tar paper and all looks great. Liner in, vapor barrier on reinforced and straightened wall studs. Somehow my Portland cement has turned into Portland cement Plastic Cement. As your stucco base probably uses plastic cement my question is will my preslope be OK? I have since purchased regular portland cement for the top layer and have lime on hand for my curb and bench top. Please make my day and tell me not to worry about the bottom plastic cement preslope!
Your guide is exceptional! I didn’t give the shower reno a second thought as we started taking the tile off the walls…but panic sank in when we took up the floor. I think I would have hired someone to clean up my mess had I not found your site.
I do have a question about the curb. I’m on concrete so installing a brick curb. I purchased a piece of corner lath (all I could find at the store) that I thought would fit my curb. Well I measured after I got home and realized I’m about two inches short from completely covering the curb when I bend it into a U shape. Would it be possible to cut several strips across the width and place them side-by-side over it? Or do you think they’d shift and create chaos? Lord knows I don’t want my dog to burst into flames, and so far through this project he’s been unscathed. I definitely don’t want to screw it up now.
Your wisdom and guidance are much appreciated.
Hi Roger,
As a preventative to the lath puncturing the liner, could you glue tar paper to the liner over the curb before pouring the bed? I have seen some glue tar paper to the pre-sloped concrete to prevent abrasions on the liner. It may be overkill, but I would prefer that than under…
Thanks,
CW
Hi CW,
No. Why would you want constantly soaked tar paper in the bottom of your shower? The liners are stronger than most people imagine, don’t create problems where there are none.
??♀️ True enough. Thanks for reply!
CW
I like your comments and suggestions. The only thing I haven’t done, according to your web site, is installing the curb lath before I put in the final floor mud. It’ like the instructions for diffusing a bomb. Reader “Cut the blue wire”. Diffuser “OK.” Reader “But first……” I am not complaining. It’s just going to be more of a challenge to make sure the lath stays where it is suppose to stay inside the floor pan.
Sorry Dave, it’s stuff I don’t think about so I get that little lull in there at times.
So, I basically prepared the sill the same way that you did- with one exception:
Once the lathe was on, I formed the sill with wood and filled it in with sand mix.
It came out great, except for one thing- My tiler thinks that the sand mix is so porous, that the wet bed water will cause the sill to soak up and stay wet. And once that happens, swelling will result. Bear in mind that the sill is sitting on sub-floor plywood on the outside of the shower. Two remedies I can think of: Somehow waterproof the sill with concrete sealer, or grind a slot on top of the sill and fill with epoxy. Am I losing my mind?
Hi Mike,
Yes, you’re probably losing your mind – but let’s deal with the sill and your psychiatrist can deal with the mind stuff.
All you need to do is cover the mud with a topical membrane. That can be a liquid like redgard or hydroban, or a sheet like kerdi. The sand mix is porous, it’s meant to be by design.