
This post describes the top, or overlay, of the curb for your traditionally waterproofed shower floor with a liner. The stuff you stick the tile to. It assumes (my posts often assume quite a bit – they are condescending little bastards…) that you already have the curb substrate built, your preslope in, and the liner installed. Those steps are described in the first couple of posts showing you how to build all that stuff here: How to create a shower floor for tile.
First I’ll answer a few questions I get constantly:
NO, YOU CAN NOT INSTALL HARDIBACKER TO YOUR CURB FOR YOUR TILE! (Unless you are using a topical waterproofing method for your shower floor.) There is no way to attach the hardi to your liner without puncturing it, which renders your waterproofing efforts useless. You need to have wire lath over your liner to hold it to the curb and wet mud installed over that to form a substrate for your tile.
Yes, you can use deck mud for your curb if you want to. However, it is not nearly as stable on the sides of your curb. It is not sticky. It may fall off the sides of your curb even after it cures, and take your tile with it. And it may crumble as you work with it after it cures, because you can’t pack it tightly enough to be dense enough on your curb. But yeah, you can use it… ![]()
No, you can not bond tile directly to your liner. No, you can not bond tile directly to your lath. Neither will last. Ever.
When you create your shower floor you are using deck mud. You need wet mud for your curb due to the vertical surfaces. Wet mud is almost identical to deck mud, it just has powdered masonry (or hydrated) lime added to it. A proper wet mud mix is 1 part portland cement, 1/2 – 1 part powdered masonry lime, and 4 parts sand. It is mixed just like deck mud except it needs more water. It should be the consistency of peanut butter (the creamy, not the chunky…)
Powdered lime is nasty stuff! Do not get it on your skin, it itches and burns at the very least and some people have horrible allergic reactions to it causing nasty rashes. Do not breathe it in! Seriously, it’s nasty stuff, handle it with extreme care.

Quikrete stucco base coat
But there is an easier way! I now usually use stucco base coat in place of wet mud when doing smaller areas such as just a curb or bench. It is a very similar mix. Although I don’t know what the exact ratios of the ingredients are it works and cures exactly like my wet mud. It is pre-mixed and bagged and you can find it in the concrete section of any big box store. So I’ll show you how to do your curb using that. Should you choose to mix your own wet mud everything is exactly the same.
Once you get your liner installed and all your dam corners in you need to cut strips of wire lath to fit over your curb. USE GLOVES! Wire lath is sharp and will slice the crap out of your hands! So wear gloves and be careful.
Measure from the liner to the top of the curb, up over the top and down to the floor on the outside of the curb. Subtract an inch from that measurement and this is how wide you want your strips to be. Once you do that cut it the length of your curb.
All the photos I have are of a double curb with a 90 degree angle. If yours is just one curb across the front of your shower it works the same way, but I get a lot of questions about these as well. You can click on any of them for a larger version.

Bent lath for curb

Bent lath for curb
After you get your lath strips cut you need to bend them into a ‘U’ shape. Measure the distance from your liner to the top of your curb and mark that on your lath. That will be your first fold. Fold it all the way over onto itself, not just a 90 degree angle. You want to overbend your lath so that when you put it over the top of your curb it will hold the liner in place.
Your second bend will be the width of your curb away from the first. If you have a 2×4 as your curb just take a scrap 2×4 and place it in the nook of the first fold and fold it around the 2×4. Same works if you’re using bricks. Once folded your lath should look like the photos on the right.
Take the lath and place it tightly over the liner on the curb. You can nail the OUTSIDE of the lath to hold it in place, the deck mud for your shower floor will anchor the inside. DO NOT nail the inside or top of your curb!

Lath wrapped over the curb

Lath wrapped over the curb and corner
The lath should fit snugly against the liner. Overbending it like you did causes it to spring against the liner rather than flapping in the wind. ‘Spring against the liner’ isn’t exactly the best description, but it’s the best I can come up with. Damnit Jim! I’m a tile guy, not a creative novelist!
If your curb is created out of brick you obviously can not nail the outside of it. The spring action (see, now it’s an action and everything…) will hold it in place.
The lath DOES have the ability to puncture your liner! So you need to be a bit careful with it. But you do not need to baby it, the liners are much more durable than you might think. In other words – don’t be afraid to touch the liner with the lath. ![]()
Once it’s in place you have an anchor for your mud so it will stay in place. Once the mud is packed onto the curb it will pack up under the wires of the lath and hold in place. With the outside corner, like this shower, I also cut an additional small piece of lath to wrap around the top of that corner, like the second picture of the lath on the curb.

Properly mixed stucco base
Once your lath is on the curb go ahead and install your top mud deck. That part can be found in Part 4 of creating a shower floor.
Now mix up some stucco base coat. The water ratios on the bag will actually give you about the correct consistency, but begin with a little less water and add a bit more as you mix just to be sure you don’t get it too thin (runny). Again – it should be about the consistency of peanut butter.

Packing mix into the lath
YOU DON’T NEED TO MIX THE ENTIRE BAG! ![]() I just put that there because I know somebody will. You just need enough for the curb. I don’t know how much that is, I can’t see your curb. You can always mix more if you need to.
I just put that there because I know somebody will. You just need enough for the curb. I don’t know how much that is, I can’t see your curb. You can always mix more if you need to.
I use a magnesium mason’s finish float to form and finish my curb (and decks) but you can also use a wooden float or flat trowel if you don’t have one.

(very) rough finish on curb
Once it’s mixed just start by scooping a bunch of it onto the lath. Pack it into the lath well by running your float both ways to ensure it’s embedded beneath the wires of the lath, then start forming your curb. Ideally you want it about 1/2″ thick, but there is no real number for the thickness, so shoot for that. It’s not a big deal if you get it a little thinner or thicker than that. It’s just a guideline.
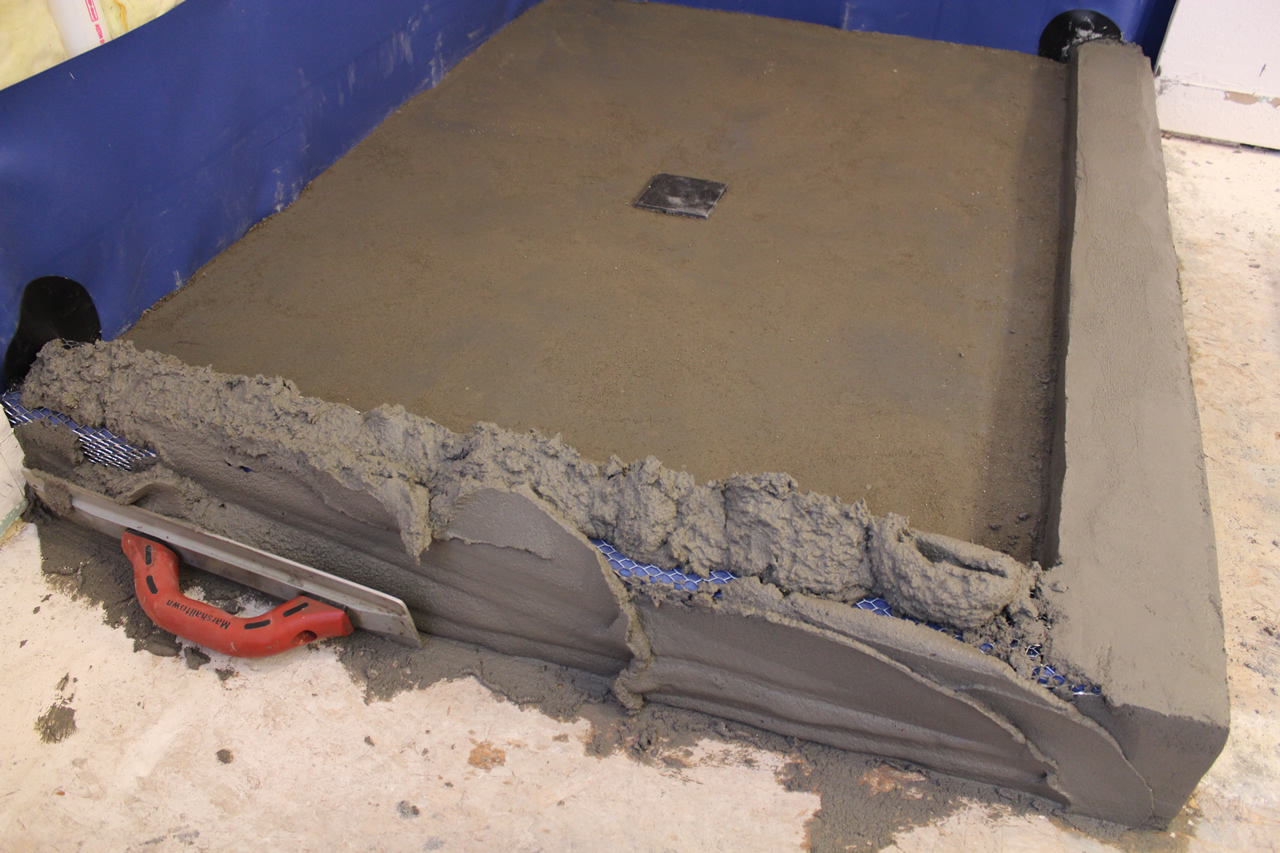
Packing and embedding mud into lath
You want to make sure that every side of your curb is straight (flat). You don’t want them to be wavy. You also want the top to slope slightly into the shower so water will drain into the shower rather than out of it. Your wood or bricks should also be sloped beneath the liner, but you want the tile on top sloped as well to rid the curb of most of the water.

Finished mud on curb
To finish the mix off and get a nice, smooth finish, dip your float or trowel in water and run it down the curb. It will smooth it all out. If you have any rough areas that just seem to get worse the more you mess with it (and you will) – leave it. After it cures you can always sand it down a bit to remove any uneven areas. Just make sure you have enough to sand down – that it’s overbuilt rather than underbuilt.

Finished curb ready for tile
It’s much easier to sand down to get what you need rather than trying to add something to the curb to get it where you need it.
Your curb does not need to be perfect! Oftentimes (typed with my pinkie in the air) the more you mess with it trying to get it perfect, the more you’re gonna screw it up. As long as it is flat (straight) and the top is level and sloped to the inside of the shower you can fix any imperfections after it cures or make up for inconsistencies with thinset as you set your tile.
Once it cures it’s ready for tile. You can bond tile directly to the curb now with thinset, it’s all ready to go.
Now, if you please, a moment of silence for the reader’s dog who burst into flames this morning because he tried to bond tile directly to the liner. You know who you are. And no laughing at him, before you read this you didn’t know how to do it either. (And he IS NOT the first one to do that!).
The dog in question is fine – we just had to snuff him out…


Soooo my tile people installed the mortar bed today and i thought doing the curb would be part of that, but it is left unfinished. Can the lath be placed after the deck mud mortar bed and then continue with the wet mud as you describe above?
Hi Jessica,
Yes, it can. Different installers do things in different order. It’s the end result you want to be concerned with – not so much the order they do things.
mister elf……you never answered my question 2 weeks ago about sakrete’s instructions to tile the deck mud made from their sand mix [plus additional sand] within 24 hours of placement lest it goes green for 28 days. maybe i forgot to tick the notify me box? i will tick it this time mister elf
Hi Frank,
You can tile it whenever you want. It doesn’t need to sit 28 days nor do you have to tile it withing 24 hours. And I do remember answering the question, I just have no idea where it is.
Forgot to select the notify me button before I submitted my question
Thank you again
Hi Roger! Your site is immensely helpful!
Can I use Sakrete Type S Mortar for the curb?: http://www.homedepot.com/p/SAKRETE-80-lb-Gray-Type-S-Mortar-Mix-65302880/100350211
Thank you!
Alison
Hi Alison,
Mortar mix can not be used in any form to make deck mud or wet mud, so no… Sorry.
FYI i see a base coat with water stop by quikrete. I’ll probably just use the stuff you did, I’m using the goof proof quick pitch system for
My first shower remodel at my house.
Roger,
So my water test failed miserably. There was a massive amount of water leaking over the liner. I then realized that cement had gotten down into the screw holes for the drain so I couldn’t fully (or really at all) bolt down the top part of the flange, that goes over the liner, to the bottom part under the liner. I used silicone to seal around the flange underneath the liner though. Could the reason that it leaked be because I couldn’t secure the bolts down enough? Is there any way to get the cement out of the screw holes? I think I can use vinegar to dissolve the concrete, but I don’t know.
Second, I attached two photos of the liner. On the right wall (looking at the picture), the liner does not extend out to where the door would be. The second photo is a picture of the door. Is this okay? I’m not sure if you can tell what I’m talking about.
Lastly, which kind of silicone do I use? There were multiple kinds at Home Depot. Does it matter?
Hi Dave,
Yes, the reason is because the top flange was not bolted down tightly. It sandwiches the liner between the two flanges, the silicone is there ONLY to prevent water from seeping back up through the weep holes in the drain. Vinegar works, CLR works better. Pour it down in there, let it soak a couple hours, rinse it out, repeat as necessary. Or…go get shorter bolts.
Yes, the liner is fine. Silicone is silicone, as long as it’s 100% it’s fine.
Hello Kyle – fantastic website and appreciate the help. I’m about to embark on my first shower pan project this weekend. My questions are as follows: If I build the shower curb as you stated with the membrane pulled over the curb (3 2×4’s) with no nails and only glue, then I cover with wire mesh/stucco, when I plan to cover the curb with either tile or marble and finally add the glass walls/door, won’t the hardware for the glass walls and doors penetrate the membrane upon installation? Should I redgard the curb 2×4’s before covering with membrane? Also should I redgard the bench wood framing and the plywood top and then place liner over the bench? What do you suggest I cover over the bench top to attach the time? Same idea as the curb? Wire mesh/stucco? How Far up should I run the membrane on the shower walls/nail? Then when I cover the walls with backerboard how far down do I stop screwing the board to avoid penetrating ghe membrane? thank you
Hi LT,
Not sure who the hell Kyle is, but I’ll answer your questions.
There is no glue involved (unless you’re speaking of the glue for the dam corners). It’s just the 2×4’s, then lath, then mud, then thinset, then tile. No, you should not redgard your 2×4’s. Yes, something from the shower door will penetrate it. If you have a glass guy that knows what he’s doing he’ll drill the hole, fill it with silicone, then drive in the fastener. This seals the hole as the screw is driven in.
Do not redgard your framing. If you have redgard you do not need to run the liner over your bench. Treat the front of the bench like the wall, run the liner a minimum of three inches above the finished height of your curb, put the backerboard on the walls and stop the screws three inches above your curb. Cover the rest of your bench with backerboard screwed to the framing, then starting about two inches above it on the wall, paint redgard over the entire bench stopping at the bottom of the face of the bench.
O great Elven orator (orater?) of Floor Lore….
I am almost finished with tiling my shower and have been looking for guidance on the curb. If I simply wet saw the top for my curb out of my 12×12 tiles, wont there be a potentially life ending sharp edge on them? I see lots of stuff about using bullnose tiles, do I need to look into purchasing some? Would they be color matched, or would I have to just get “close” (as in horseshoes or hand grenades).
Closing on a serious note, your site has been very helpful during my remodeling project. Thank you!
Hi Kevin,
You may be able to get matching bullnose tile for your curb, it should be available where you bought your tile. You can also get a schluter edging and use it if the bullnose is not available. You can just cut tile and stone down the cut edge so it’s not so sharp, but it always ends up looking like crap with the bare tile edge showing.
In “Waterproofed Floor and Walls with Liquid Topical Products” there is a photo showing hardie backer over the bricks. Is this a necessary step? If so, how do I attach the hardie backer to the bricks?
And what is the proper height to cut the drain riser before pouring in the rest of the concrete for a Kerdi drain?
Thanks,
Scott
Hi Scott,
i don’t think I’ve ever done that, what page is it on? If you need to you can attached backer to the brick with thinset.
Place the drain on top of your existing riser, then measure from the rim of the drain to the floor, subtract 3/4″ and that’s how much you need to cut off of the riser. For instance, if the rim of the drain is 3″ above the floor you need to cut 2 1/4″ off the riser for the proper height. The drain rim should be 3/4″ off the floor when glued in.
On page 15 there is a crappy diagram that shows backer board on either type of curb. I’d rather not put backer if it isn’t needed. So it’s o.k. to just let all the thin set cure and then complete the topical coating, in my case Aquadefense?
Yes it is.
I don’t understand. “Yes it is” to on page 15 is the crappy diagram or “yes it is” o.k. to just put aquadefense straight over the bricks and thinset?
Sorry, but sometimes you have to spell it out for us.
Yes it is okay to just put AD on the bricks and tile it.
Because I didn’t know better, I bought some insulating fire bricks on craigs list to do my curb. Now I’m reading about these alumina silica bricks and wondering why I didn’t find some regular concrete or clay bricks. Should I simply toss the light weight fire bricks or can I actually use these with unmodified thin set?
Hi Scott,
I would get regular bricks, I have no idea how those will be affected by any type of thinset.
Hi Roger,
what’s your recommendation for minimum height for the threshold wood framing before applying liner? My interior dimensions are 36 x 60 with center drain on 3/4″ osb subfloor. Shooting for about 2″ thick base at drain and 2 3/4″ thick at wall (pre-slope + top coat). I would like to minimize the curb height but remain compliant.
Thanks!
Hi Steve,
Minimum curb height is 2″ above the finished height of the shower floor. So yours needs to be 4 3/4″ plus the height of your tile.
PS
I was planning on using Gypcrete Type N Mortar for the curbs. Will that work?
No. You need something with a hell of a lot more sand. Stucco mix works well.
I posted about the non-drying pan, but I forgot to enable email notifications for new posts.
Thanks again!
Hi roger,
Thanks for the great site! So I did a mini water test where I put water in the liner (with the preslope) and let it drain. Not all the water drained out. Most of it did, but not all of it did. Some of it remained. Then, when I went back 24 hours later, it was all gone. Is this something I need to be concerned about? I haven’t done the full 24 water test, where I plug the drain and let the water sit for 24 hours. All your help is greatly appreciated and I really can’t emphasize enough that I couldn’t do this without your book/site!
Hi Dave,
It depends on how much water and WHY it didn’t drain. If there was less than about 1/8″ and it was just sitting on top of the liner it’s likely just fine. If there are ‘pools’ then you may have an issue. It’s not going to TOTALLY drain every time you get it wet – it’s completely normal.
Hi Roger,
Thanks for all the great info. I used Fat mud for my curb and i didn’t have enough of it, it was really close and unfortunately the store was closed once i had started. What is the best way to finish now that it has dried? Can i add more fat mud if i put thinnest on the curb first?
Thanks
Josh
Hi Josh,
Yes, you can add more if you use thinset to bond it to the existing mud.
Roger, Thanks for your site! Can I tile OVER the curb of a fiberglass shower? The shower is in great shape except for the curb. We took out the corroded shower doors and aren’t replacing them—we’re just using a shower curtain–but it left a rusty, messy line on the curb and also some pitting (it’s still waterproof).
I was thinking of tiling the walls above the shower to match…
Thanks!
Hi Carol,
Not with anything that will last long-term. You COULD stick tile up there with silicone, but I honestly don’t know how long it would last for you.
On a fiberglass shower curb you’re going to get a lot of flex so you’ll need to use something that cures flexible.
You could lightly sand the shower and use a glue called “3M 5200” it comes in either white, tan or black. It’s well known among the boating crowd for its unbreakable unbelievably tenacious adhesion that stays flexible. It takes a week to fully cure.
It’s also somewhat expensive at around $14 for a 3oz squeeze tube (much cheaper ounce-per-dollar to get a full caulking gun tube at $18). Warning, once you glue something with it – it’s not coming off, ever.
You’re also going to have to use a flexible grout. Either more 5200 or a urethane grout. 5200 can be cleaned up with xylene or acetone while it’s still liquid, after cure it has to be scraped off with a razor blade. 5200 is a moisture cure so the deepest part under your tile may take longer than a week to fully cure.
Thank you so much for this valuable information! I will look up this amazing glue for sure!
Thanks for getting back so quickly! wow!
Thanks Dave!
Is it necessary to do a lath-and-mud over redguard applied on a brick curb? (It’s on a concrete floor)
From what I understand I’ll be tiling directly on the redguard everywhere else so why not the curb as well and save myself some time and a bit of expense?
Thanks!
Hi Dave,
You do not need to do lath and mud, redgard and tile directly to it.
Hi Roger,
First let me say that your site is amazing and your ebook as well. They have saved me from numerous screw ups along the way. I do have several questions about my shower curb that I just built though. I thought, before reading your book, that a shower curb was properly sloped and leveled when applying the top layer of deck mud. I now see that this isn’t the case. My curb is not level vertically, in one spot, by about 1/4 inch. The rest is level. I can’t attach a pic as its too large.
Also, it is not properly sloped towards the drain. The bricks are level. I plan on installing a frameless sliding shower door. My questions are as follows:
1. Can I level out the shower vertically when I put my fat mud on top of the curb?
2. Can I also properly slope it towards the drain when I apply the fat mud? Or even with the Thinset when I go to tile the curb?
3. Do I need to start over with the curb? I don’t want to, but will if you think it’s best.
4. Finally, I put the bricks right on top of each other. How bad is this?
Hi Dave,
No, you don’t need to start over with the curb. Putting them on each other is not ideal, but if you have a layer of mud over the top that will compensate for any movement in those joints, so you’re fine. You can both level and slope the curb with the fat mud.
Dear Mr. Elf,
I’m on my third reading of your e-epistles, not only because I’m slow, but because I pick up something I missed earlier. True page scrollers; why have they haven’t yet made the NYT Best Sellers list is beyond me. And you, like the idle farmer, are outstanding in your field. (groan) Truly a profound elucidator (twoo pinkies) which is apparently legal in Colorado.
But I digress. Not my first “seemed like a good idea at the time” project, but first involving masonry materials & application. Feel like I’m due some Continuing Ed. credit when the shower door is finally installed.
So, the first few of many:
1) Not to be Dr. Anal, but a question about the reference to putting thinset as almost a ‘primer’ on concrete slab prior to pre-slope mud deck. Thinset is still ‘wet’ when mud deck is applied?
——–
2) I have leeway in constructing the rear wall of a former tub alcove such that I could leave a gap in the corners. I have seen where some folks fold the membrane in a 45 degree configuration and ‘stuff’ in the gap (assuming gluing that fold). I’m guessing you feel it’s better to just notch more deeply and fold the membrane so it all remains in the confines of the perimeter wall?
——–
3) At ~3:45 into the Oatey membrane installation video-
https://www.youtube.com/watch?v=dRwu1SE_Ass
they mention the option of using an adhesive to secure the membrane to the pre-slope. When I phoned the rep said Loctite Tub Surround was the suggested adhesive. Your thoughts, yea or nay on that step, please.
Many thanks!
p.s. Wasn’t Monkey Mauve a popular Sherwinn-Williams color?
1. Yes, thinset is still wet when you apply the deck mud. It is not to ‘prime’, but to bond the deck mud to the concrete.
2. You can do it either way, provided you do not cut the membrane and any open ends of the folds point up.
3. No reason to at all. Once you get the top mud deck on there it isn’t going anywhere – ever.
P.S. Might have been, but mauve still shouldn’t be a color. At all.
Roger, you are a rockstar. I can’t find stucco base coat close to me. They do have Ash Grove Pro Mix Portland Lime Mortar. It says it is Portland cement, fine graded sand, lime, and “other approved ingredients.” Have you heard of this stuff, and will it work for my small 48″ curb? Thank you!!!
Hi Amanda,
Never heard of it, so…maybe? I would get it and mix up a little very dry, like regular deck mud. Just wet enough to hold together when you squeeze a ball of it. If it sticks together like that I don’t see why it wouldn’t work for your curb. It has all the right ingredients, and a few others it sounds like.
  Give it a shot. Worst case scenario it’ll peel off or won’t hold together and you just try again with something different.
I love your detailed info and humor; thanks for posting. I have been renovating an 1875 farmhouse over the past few years and am coming into the home stretch. There were many things I have done myself with great success but have found when I have paid for professionals to assist, have been less than pleased with the results… Plumbing and water are both things that I feel need to be handled meticulously yet as I prepare to tile my master shower, am feeling anxiety build as I realize what the professionals have left me with. Please look over the attached pictures. I need a plan of attack to improve upon what was done. Hardy backer was installed over the liner but no moisture barrier was put up… Solution? You will see that the liner was not laid tightly against the curb and has seams that have been taped… Solution? The entry portions to the shower are still revealing the 2x4s but will be tiled… Solution? Help! I’m very frustrated because I paid to have this done for me and now i feel that I’m not only going to have to do it myself, but pay more money. I just want it right. Thank you for your time.
Also have some.major gaps to contend with before tiling…
Hi Heather,
You have quite the mess there. None of it looks to be done correctly. The liner (is there a preslope beneath it?) needs to be removed and properly installed. I’m unsure what you mean by ‘taped’, but if that liner has been cut in any way and not properly bonded back together it needs to hit the dumpster. The backer looks like crap too, but it can actually be saved by installing kerdi over the walls (solves the no moisture barrier issue as well).
Yes… An absolute mess. That’s what I figured in regard to the liner. Yes, there is the slope under the liner… I did it and it was done correctly, unfortunately I relied on others to help me finish it up. I will have to redo the liner and move forward from there. Glad to know the hardi backer is salvageable. Thank you for your help. Btw, I mean “taped” as in literally… It looks like there were cuts made or areas pieced together and then taped with a tape that looks similar to duct tape.
This is a great site, i wish i came here first. Well i think i may have an issue, i built my shower with a curb of 4 – 2×4 stacked, what i didnt account for was the extra height i gain when using “curb perfect” to go over the curb. Now with the mortar layed, i have a 8″ curb on the outside and 4 1/2″ curb inside. This is before thinset and tile.
Do you think this will be too high of a curb and need to start over or will it be ok? Doesnt seem to much when stepping in and out at the moment.
Hi Jay,
That is HUGE. It won’t negatively affect anything, short of having to step over it, but that is a ridiculously huge curb. I would change it. I normally use three stacked 2×4’s.
Roger,
Thanks for the reply. Your site helped a great deal. I ripped out the curb and went with 3 stacked 2×4 with pressure treated against the foundation and used lath and the stucco mix as you mentioned above and now the curb looks perfect height. I still need to sand the edges and my tiler says its ready to go.
Thanks a bunch!
Great site!!
I bought a 6-yr old condo apt with some issues in the travertine tile shower. You’ll like these!
All of the corners / plane changes are grouted (and therefore all cracked). Those at the floor had somebody’s silicone “repair” over the grout, which weeped water when I pulled it off.
There are grout cracks between the 2×2″ floor tiles, but the tiles aren’t loose. These cracks were always wet / discoloured, and appear to be weeping water up from under the grout.
Also got “wet bugs” now (silver fish, milipedes, wood louse…). Found gaps under the curb caps (Corian) that had grout, not silicone. Most grout was gone leaving a gap for water to get under the caps. I removed the glass walls and the Corian caps came right off the curb with them. They were not stuck to the curb, only the silicone on the glass walls held them there!
Mould and bugs under the caps. Gaps/cracks where the curbs meet the walls, giving a leak path for water to get behind the wall tiles and/or over the curb.
Since the grout weeped when I removed the caulking “repair”, I take that as a good sign that water was still trapped within the shower behind the grout/tiles, and not getting outside the shower much. (The bugs make me wonder through…)
All tiles are still attached very solid, on the wall, floor and curb.
On the curb is about 1/2″ of pinkish mortar(?) that failed to grip the smooth Corian caps (and not sloped toward the shower). Under the mortar is white non-metallic mesh, 1/4″ squares. Don’t know what’s under that, or if it has a membrane.
My plan is to remove all corner grout (oscillating tool with grout blade) so they can be siliconed.
Should I also grind and regrout the cracks between the 2×2″ floor tiles? Or just leave them as is?
For caps, how could I remove the topmost mortar without damaging the stuff under it?. And should use Corian at all for the caps? Early search suggests maybe no. But if Corian is okay, what adhesive/mortar should I use under them?
My hope is with properly replaced caps and sealed up with silicone that water will no longer get under the caps and leak who-knows-where. And replacing the corner grout with silicon will reduce the amount of water that gets under grout/tiles.
Many thanks!
Update: Some gentle chipping at one of the corners shows the curb’s construction. It’s wood structure; then membrane that appears to cover only the top of the curb (not the outer face); then 1/2″ cement board on top and sides (that’s the “mesh” I mentioned earlier); then mortar for the tiles on the sides and whatever the pink “mortar” is on top for the curb caps. Oh and there’s a rusty nail through the cement board and membrane into the wood, so it’s been nailed at least at the edge of the membrane into the top of the curb.
Since water was getting under the caps and the structure is wood, I get the feeling the tiles have to come off to possibly replace the curb. Is it possible to do that without replacing the membrane?
You’re correct, that needs to be replaced. And no, you can’t do that without replacing the membrane since they likely have penetrated it by installing the cement board on the sides.
Hi Kyle,
I would be more worried that your substrates are not waterproof. However, yes, you should regrout the floor. You can force a drywall knife between the cap and whatever is beneath it to ‘shear’ it off. Corian is not required (waterproof substrate is required), but if you want it you can install it with thinset.
Thanks! I’ve since decided the shower will be replaced. Further disassembly revealed multiple screws through the liner (holding cement board in place) as well as other holes/gouges in it. Also the corner where the curb meets the wall is not covered by liner. The curb wood doesn’t even attach to the wall framing. The tile inside the pan came off very easily and the cement board was mush. I can only imagine the water damage under this shower. It looks like a thoroughly crap job.
Going to replace the neo-angle layout with a rectangle with a linear drain at one end.
When creating the pan was it just liner and bed concrete? Or did you put mesh in their (bottom? middle?) I have a 60×40 shower with a bench I’m doing and was curious. Also I’m running the liner up and over the bench too and using red guard on the walls. Any tips would be great. -and great article
Hi Nick,
I put tar paper over the subfloor, then wire lath, then the preslope, then the liner, then the slope. It would be better to run the liner up the front of the bench (like another wall) then waterproof the bench itself with redgard.
Roger,
Great site! I have preslope, liner, curb and mud pan installed. I’ve also installed most of the wall tile, but it’s time to install the curb cap.
Hydroban was used on the walls and a few inches in on the pan floor.
My question is do I need to apply hydroban to my entire curb before setting the cap?
Thanks Roger!
Hi AStritt,
Provided your curb was properly waterproofed with the liner then no, you don’t need to. You can if you want to, though, it really won’t hurt anything.
I read in my lowes book to install the membrane, then the backer on tge walls, then tile the walls, and lastly mud and tile the floor. So i finished tiling my walls and i wondered if my floor mud should go right up to my wall tile, touching the tile or if it should go slightly below it? Allowing the floor tile to rest under the wall tile?
Hi Summer,
You can do it either way, I prefer the floor tile beneath the wall tile.