72 hours.
That’s the answer to your question. 72 hours. Three days.
Your question, by the way, is ‘Now that I have my linear drain in and my shower deck fabricated how long do I have to wait before installing my Laticrete HydroBan to waterproof everything?’
That’s a great question!
72 hours.
If you don’t yet have your linear drain installed and your mud deck fabricated – you’re in luck! You have time to do that. Go read this first: Installing a Laticrete linear drain (part 1)
Then you can go on that three day bender vacation.
‘Why 72 hours?’, you may ask. Also a great question. Negative hydrostatic pressure.
‘What is that?’, you may ask.
You’re getting me off track here, stop with the questions. I haven’t yet written that post. The short answer is vapor dissipation from your mud deck putting pressure on the back of your membrane which may cause it to become unbonded. So don’t do that. Let’s move on…
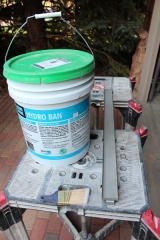
 Now that you’ve installed your drain flange (the lower portion of the drain) and created your shower floor you need to waterproof it. Being that the drain is actually called the Laticrete HydroBan linear drain – we’re gonna do that with Laticrete HydroBan.
Hydroban is an elastomeric liquid membrane which is brushed, rolled or troweled onto your substrate to waterproof it.
 My preferred method is a trowel. I use a 1/4″ x 1/4″ v-notch trowel and install my first layer with the notched side then let it cure. This will leave about 1/4″ ridges on your substrate with cured waterproofing membrane. With hydroban you are able to install your second layer after only 2 hours! The second layer is then installed with the flat side of the trowel, essentially filling in the ridges.
The membrane is painted up onto the edges of the drain flange (all outside, horizontal edges) and creates a single seamless waterproofing layer for your shower floor right into your drain.
After that cures you have a waterproof membrane with the proper thickness and you can begin installing your tile.
If you’ve read the first part (and if not – why not???) you know there were a couple of idiosyncrasies in this shower I needed to deal with, all due to the width of the shower. One of them was the need to have the drain flange run under the wall substrate – cutting the wall so it actually sits inside the drain.
 With hydroban this is not a problem! You’re able to paint the membrane up and into the drain over the floor and down the wall, seal it at the bottom where the substrate is inside the drain, and continue it out into the drain a bit. This creates a single, continuous layer of waterproofing from the wall into the drain pan. You don’t need to worry about any water getting to the bottom of, or behind, your substrate. A perfect product to create a perfect solution in a great many installations.
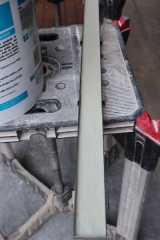
Since we’re working with the tile-in version of the drain, and it’s currently just steel, we need to put something on it to allow the tile to properly bond to the steel. Guess what we’re gonna use for that.
That’s right – HydroBan. Good guess…
The HydroBan will bond (tenaciously so) to the steel, and the thinset will bond to the hydroban. Almost like the whole system was made to work together, right?
All you need to do is brush a couple layers of HydroBan into the drain grate channel and let it cure. It doesn’t necessarily need to be absolute full coverage – no need to waterproof it. You’re more concerned with creating a proper substrate to bond the tile. Once cured the HydroBan will do that very well.
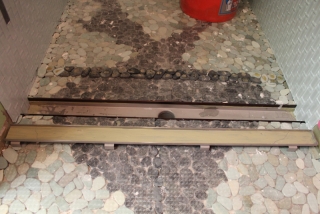
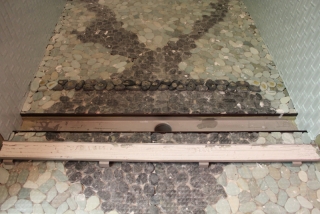
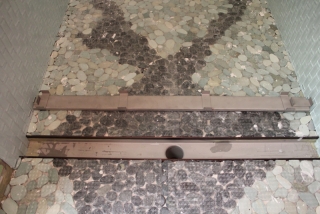
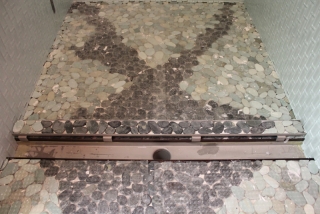
With this particular shower I’m doing a complete custom mosaic floor with flat river rock. The best way to get this type of tile into the drain is to first arrange the rock into the grate and get it where you want it, then flip it upside down and pull the grate off. You should be left with just the line of upside down mosaics in the shape of the drain. Then install thinset into the drain grate and flip it back over the mosaics. When you pull it up you should have the mosaics in the drain grate in the proper placement and all flat and level on the top. Like this:
Once that cures you’re all set. The tile or mosaics in the drain grate get grouted just like the rest of your tile. It is removable for maintenance and, when in place, is nice and solid and blends into the installation.
Although I’ve used the mosaic river rock on this installation the use of a Laticrete linear drain allows the use of any size tile you want. If I wanted to install a single 3 foot by 3 foot tile on the shower floor I could have (don’t do that – it’s slippery). The single, flat plane allows you to take your installation and design from wall to wall, including your shower, in the entire bathroom without breaking it up with the smaller mosaics required for a regular concave shower deck.
Linear drains are one of the best products to become readily available in the last few years. They are extremely popular and becoming more in demand every year. They are, in my opinion, heading toward becoming the standard for custom showers in the near future. Laticrete has made them available with a fine product and coupled the use with one of their quality membranes to become a complete integrated system which is extremely easy to install.
I have installed these drains from five different manufacturers and Laticrete is, BY FAR, the easiest, quickest and most straight-forward installation. It is a painless installation and always sets any installation apart from every other diy shower around. Get one! You won’t regret it. If you don’t, well, every time you stare at that little round drain grate in the shallow bowl of your shower floor you’ll kick yourself.
Due to several requests I will now answer the question that seems to be absolutely baffling everyone that has read either of these posts: Yes, one wall in the bathroom is painted green and the other is painted pink. It’s paint. You don’t want to get HydroBan near that other pink waterproofing. The HydroBan beats it up and takes its lunch money. Besides, I tiled over that pink wall with glass.
It looks better now. ![]()


You can click on any of the photos below to view a full-size version.



I’ve read your book on liquid membranes and this post. They’re great, but I have two questions.
The Hydroban spec sheet says it is not suitable as a vapor barrier for a steam shower. Should I install plastic sheet behind the backer board as a vapor barrier in addition to using the Hydroban as a waterproofing layer?
How does one do a flood test on a curbless shower?
Hi Tom,
Yes, you need a vapor barrier behind your substrate as well as the hydroban over the face of it.
Flood test – spray foam is your friend. Create a threshold with it, do your flood test, then just scrape it off. It is sufficient for a flood test barrier.
In the comments, you say this walk-in shower has a 1″ mud pan on wet shower side, and 3/4″ plywood + Ditra on the “dry” outside. I assume this was added on top the plywood subfloor so the finished floor height at shower entrance was about 1.375″ above subfloor (assuming 3/8″ thick tiles).
My goal was to keep the bathroom floor and walk-in shower entrance no more than 7/8″ above the existing subfloor so I could have the same floor height throughout my tiled house. (In other words, the other tile floors are built-up to 7/8″ above subfloor as you prescribe: subfloor-mortor-1/4″ HBacker-mortor-3/8″ thick tile.)
It seems that if I don’t lower my subfloor within the shower to the right depth, but instead just start at the existing subfloor level, then I will have only 1/4″ thick mud pan at the shower entrance where I planned to put the drain. That’s way less than the 1.5″ mud pan prescribed by Laticrete, and even thinner than the drain pan itself.
So my questions are:
1) Did I understand correctly that your final floor is more than 1″ above the subfloor?
2) Are there any tricks to start at a planar subfloor level inside and outside the shower, and result in a finished shower entrance that is only 7/8″ above subfloor? I hoped putting the linear drain at the shower entrance was the trick, but it seems no.
Sorry to sound like a slacker wanting to avoid work. I just don’t understand how remodels can ever add a walk-in shower without having a height transition in some doorway (e.g. the bathroom doorway, or the shower doorway). – unless it’s possible to lower the subfloor within the shower and still create a solid & stable subfloor.
Marilyn
PS – Thanks for the great site. I am the proud owner of 3 of your books and find them very useful despite having done DIY tile for about 20 years.
Hi Marilyn,
It is over 1″. You can get to the 7/8″ by putting your mud bed directly onto the subfloor inside the shower (with tar paper and wire lath) then outside the shower having the regular subfloor you have throughout the rest of the house. You will not be able to do it and have the 1 1/2″ mud bed thickness, but as long as the drain is fully supported by the mud and your subfloor is solid it won’t be an issue.