
This post describes the top, or overlay, of the curb for your traditionally waterproofed shower floor with a liner. The stuff you stick the tile to. It assumes (my posts often assume quite a bit – they are condescending little bastards…) that you already have the curb substrate built, your preslope in, and the liner installed. Those steps are described in the first couple of posts showing you how to build all that stuff here: How to create a shower floor for tile.
First I’ll answer a few questions I get constantly:
NO, YOU CAN NOT INSTALL HARDIBACKER TO YOUR CURB FOR YOUR TILE! (Unless you are using a topical waterproofing method for your shower floor.) There is no way to attach the hardi to your liner without puncturing it, which renders your waterproofing efforts useless. You need to have wire lath over your liner to hold it to the curb and wet mud installed over that to form a substrate for your tile.
Yes, you can use deck mud for your curb if you want to. However, it is not nearly as stable on the sides of your curb. It is not sticky. It may fall off the sides of your curb even after it cures, and take your tile with it. And it may crumble as you work with it after it cures, because you can’t pack it tightly enough to be dense enough on your curb. But yeah, you can use it… ![]()
No, you can not bond tile directly to your liner. No, you can not bond tile directly to your lath. Neither will last. Ever.
When you create your shower floor you are using deck mud. You need wet mud for your curb due to the vertical surfaces. Wet mud is almost identical to deck mud, it just has powdered masonry (or hydrated) lime added to it. A proper wet mud mix is 1 part portland cement, 1/2 – 1 part powdered masonry lime, and 4 parts sand. It is mixed just like deck mud except it needs more water. It should be the consistency of peanut butter (the creamy, not the chunky…)
Powdered lime is nasty stuff! Do not get it on your skin, it itches and burns at the very least and some people have horrible allergic reactions to it causing nasty rashes. Do not breathe it in! Seriously, it’s nasty stuff, handle it with extreme care.

Quikrete stucco base coat
But there is an easier way! I now usually use stucco base coat in place of wet mud when doing smaller areas such as just a curb or bench. It is a very similar mix. Although I don’t know what the exact ratios of the ingredients are it works and cures exactly like my wet mud. It is pre-mixed and bagged and you can find it in the concrete section of any big box store. So I’ll show you how to do your curb using that. Should you choose to mix your own wet mud everything is exactly the same.
Once you get your liner installed and all your dam corners in you need to cut strips of wire lath to fit over your curb. USE GLOVES! Wire lath is sharp and will slice the crap out of your hands! So wear gloves and be careful.
Measure from the liner to the top of the curb, up over the top and down to the floor on the outside of the curb. Subtract an inch from that measurement and this is how wide you want your strips to be. Once you do that cut it the length of your curb.
All the photos I have are of a double curb with a 90 degree angle. If yours is just one curb across the front of your shower it works the same way, but I get a lot of questions about these as well. You can click on any of them for a larger version.

Bent lath for curb

Bent lath for curb
After you get your lath strips cut you need to bend them into a ‘U’ shape. Measure the distance from your liner to the top of your curb and mark that on your lath. That will be your first fold. Fold it all the way over onto itself, not just a 90 degree angle. You want to overbend your lath so that when you put it over the top of your curb it will hold the liner in place.
Your second bend will be the width of your curb away from the first. If you have a 2×4 as your curb just take a scrap 2×4 and place it in the nook of the first fold and fold it around the 2×4. Same works if you’re using bricks. Once folded your lath should look like the photos on the right.
Take the lath and place it tightly over the liner on the curb. You can nail the OUTSIDE of the lath to hold it in place, the deck mud for your shower floor will anchor the inside. DO NOT nail the inside or top of your curb!

Lath wrapped over the curb

Lath wrapped over the curb and corner
The lath should fit snugly against the liner. Overbending it like you did causes it to spring against the liner rather than flapping in the wind. ‘Spring against the liner’ isn’t exactly the best description, but it’s the best I can come up with. Damnit Jim! I’m a tile guy, not a creative novelist!
If your curb is created out of brick you obviously can not nail the outside of it. The spring action (see, now it’s an action and everything…) will hold it in place.
The lath DOES have the ability to puncture your liner! So you need to be a bit careful with it. But you do not need to baby it, the liners are much more durable than you might think. In other words – don’t be afraid to touch the liner with the lath. ![]()
Once it’s in place you have an anchor for your mud so it will stay in place. Once the mud is packed onto the curb it will pack up under the wires of the lath and hold in place. With the outside corner, like this shower, I also cut an additional small piece of lath to wrap around the top of that corner, like the second picture of the lath on the curb.

Properly mixed stucco base
Once your lath is on the curb go ahead and install your top mud deck. That part can be found in Part 4 of creating a shower floor.
Now mix up some stucco base coat. The water ratios on the bag will actually give you about the correct consistency, but begin with a little less water and add a bit more as you mix just to be sure you don’t get it too thin (runny). Again – it should be about the consistency of peanut butter.

Packing mix into the lath
YOU DON’T NEED TO MIX THE ENTIRE BAG! ![]() I just put that there because I know somebody will. You just need enough for the curb. I don’t know how much that is, I can’t see your curb. You can always mix more if you need to.
I just put that there because I know somebody will. You just need enough for the curb. I don’t know how much that is, I can’t see your curb. You can always mix more if you need to.
I use a magnesium mason’s finish float to form and finish my curb (and decks) but you can also use a wooden float or flat trowel if you don’t have one.

(very) rough finish on curb
Once it’s mixed just start by scooping a bunch of it onto the lath. Pack it into the lath well by running your float both ways to ensure it’s embedded beneath the wires of the lath, then start forming your curb. Ideally you want it about 1/2″ thick, but there is no real number for the thickness, so shoot for that. It’s not a big deal if you get it a little thinner or thicker than that. It’s just a guideline.
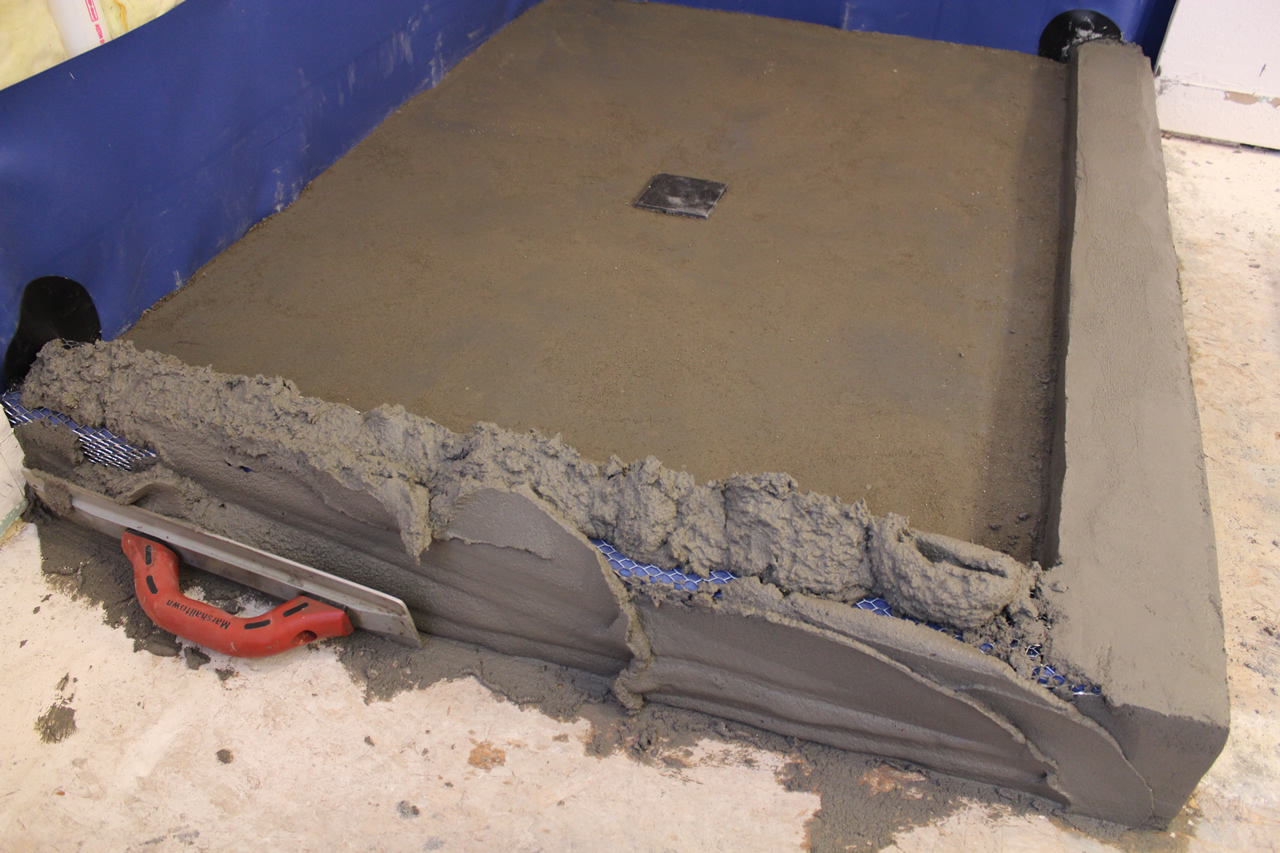
Packing and embedding mud into lath
You want to make sure that every side of your curb is straight (flat). You don’t want them to be wavy. You also want the top to slope slightly into the shower so water will drain into the shower rather than out of it. Your wood or bricks should also be sloped beneath the liner, but you want the tile on top sloped as well to rid the curb of most of the water.

Finished mud on curb
To finish the mix off and get a nice, smooth finish, dip your float or trowel in water and run it down the curb. It will smooth it all out. If you have any rough areas that just seem to get worse the more you mess with it (and you will) – leave it. After it cures you can always sand it down a bit to remove any uneven areas. Just make sure you have enough to sand down – that it’s overbuilt rather than underbuilt.

Finished curb ready for tile
It’s much easier to sand down to get what you need rather than trying to add something to the curb to get it where you need it.
Your curb does not need to be perfect! Oftentimes (typed with my pinkie in the air) the more you mess with it trying to get it perfect, the more you’re gonna screw it up. As long as it is flat (straight) and the top is level and sloped to the inside of the shower you can fix any imperfections after it cures or make up for inconsistencies with thinset as you set your tile.
Once it cures it’s ready for tile. You can bond tile directly to the curb now with thinset, it’s all ready to go.
Now, if you please, a moment of silence for the reader’s dog who burst into flames this morning because he tried to bond tile directly to the liner. You know who you are. And no laughing at him, before you read this you didn’t know how to do it either. (And he IS NOT the first one to do that!).
The dog in question is fine – we just had to snuff him out…


Hi Roger, did my preslope at 3:1 with portland and water (dry as recommended), same with curb but with lime added and much wetter. Now on to the top floor layer even at 3:1 the pre slope surface seemed crumbly but the curb is nice and solid. Should I add some lime to the final mix? Other sites say not to do this but I’m concerned if the top layer is mixed the same as below the membrane it won’t hold the tile well.
Hi Robert,
It’s supposed to be sandy, it’s normal. The harder you pound it the less sandy it will be. If you add lime to it then it will be extremely sticky, which makes it hard to screed. I would stick with the 3-1.
Hi Roger, quick question do i need to mud the curb before i mud the inside of the shower with for pitch/slope? or is it better to that first then the Curb.
appreciate the help
Rene
Hi Rene,
It is better to do the floor mud first, then the curb.
Hello Roger-
Very important question please!: I had my bathroom gut renovated 1 year ago. About 5 months ago the shower curb (slab quartz) starting separating with very large gaps. It is practically falling apart now; the outside piece of slab has shifted very badly (all grout has fallen out and I can see the thinset that was used. There is now a 1.5″ gap!). I suspect water has gotten into the curb, though I have seen no signs on my flooring.
My question: Other than a general contractor, what kind of trades person do I bring in for this problem? A tile installer? I am unclear as to who is best suited to fabricate a new curb. I understand the curb will need to be removed and the possibility of the shower floor, as well :-(. Very distressed over this.
Thank you for your help!
Hi Keith,
Yes, any qualified tile contractor can fix that for you. Yes, it is due to water getting under the curb, whether you see it on the floor or not.
I like your expertise.!
Sent from my iPhone
Hi Roger,
I’m not a professional but I have successfully constructed several mud shower pans over the years. Recently a friend asked if I might be able to tell him what might be happening to his 8 year old shower curb. I think it’s the lack of a slope to the liner on top of the curb. 4″x4″ tiles that have a 1/2 inch radius corner edge type bullnose, make up the outside surface of the curb, with the radius making the top edge. The tiles seem secure but the grout keeps coming out. I’m a little confused as to the grout failing on top. I would have thought the water would have just seeped out the bottom at the floor. There also appears to be efflorescence. Could this be an issue? Any thoughts on what’s happening would be greatly appreciated. I’ve got pics but I can’t see a way of sending them.
Bill Idasek
Dear elfin floor guy Rodger,
Do you live around north Kentucky by chance it sure would be nice to have a guy with your knowledge on speed dial and I could put you to work tomorrow if you live close or maybe I could fly you out to help me you game?
Hi Joey,
Nope, sorry. Fort Collins, Colorado.
I made a shower curb last night and when I went in and checked on it in the morning I was pretty unhappy with the results. I thought it looked okay last night, but it’s wavy and I discovered multiple places with an easy quarter inch variance. It’s also out of plumb in several spots. I attempted to go back and fix the problem parts with the stucco base I used, but it flat wouldn’t stick to the dried curb and it was just making the whole thing worse.
How much is too much when it comes to relying on thinset during tiling to mask my mistakes? Help!! Please!!
Hi Aaron,
Technically your substrate should be as flat as you can get it. You can get away with about 1/4″ variance, but that’s pushing it. You can use thinset to bond more stucco mix to it if you want to go that route.
What is the maximum pitch that a shower curb can have to allow for a euro frameless shower door to swing into and out of shower? Also how can a variance of 1/2 ” to 3/4 ” in width of a shower curb be corrected after curb has been mudded? Can the variance be made up with thinset ?
Hi Bebe,
1/2″ per foot. You can make it up a little with thinset, but to be technically correct the liner beneath the mud is what needs to be sloped. If it isn’t then you risk having water run the wrong way beneath your tile.
Roger great site, I just finished laying my first layer of deck mud for shower base and getting ready to put down the liner. How long to wait for the first layer to cure and totally dry? I thought if you put waterproof liner on top of deck mud that still has any moisture content you’re creating a “trapped” moisture sandwich that ultimately will mold underneath the liner? So how long should one wait before doing so?
Hi Jim,
You can do it the next day. The portland will utilize any moisture in the mud. You won’t trap any moisture.
Floor Elf,
I am replacing a 30″x60″ tub with a tile shower stall. My most important questions are
1. considering it is on a concrete slab AND I want to build a little quarter wall how should i build the curb/wall..? Brick curb all the way across then build wood wall on top? Build whole thing from wood? Its my first time so im lost.. oh and how thick should i build the wall? Im guessing thicker is better for stability but space is very limited..
2. drain location. the drain will be difficult to move away from the wall… Cutting concrete and whatnot.. The center of the drain is 8.5″ away from the wall… and about 4′ from the furthest wall. Is this ok or should i bite the bullet and start cutting?
Thanks Man!!
Seva
Hi Seva,
1. Frame out the wall with pressure treated baseplates (just like the regular basement walls). You can make it a 3 1/2″ frame with just 2×4’s.
2. You can leave it there, no issues with that. You’ll either have a really large slope on the drain side if your perimeter is level, or just don’t do a level perimeter and cut the bottom row of wall tile to fit.
So my shower has been hot mopped (I’m in so cal and that’s what is done here). Do I or should I put the lathe directly on the hot mopped pan, or do I mud, put the lathe and remud…..Not sure of the exact steps.
Hi Kandy,
You don’t need lath over hot mop.
My wife and I are DIY remodeling our bathroom. We had our shower pan (and curb) hot mopped. So, we dont apply lath to either the pan or curb before mudding? Please clarify! Thanks in advance for your help!
Hi, I installed a liner, wrapped it around my curb, and after learning I couldn’t tile over the liner, I cut it off of the curb. Now I’m left with a bare curb built with cut 2×4’s. How do I waterproof this surface??
Hi Tina,
You can take the piece of liner you cut off, bond it to the inside of the curb with a 2″ overlap, then cover the entire curb with wet mud, then install your tile directly to that.
you put the lathe on before the deck mud as a way to help hold it. why do you not also do this with the wall boards?
Hi Matt,
Because I don’t install deck mud on wall boards.
it worked good for me. i have 18 inch liner though so i needed the support for the bottom of the wall board. The deck mud just over laps the wall board by and inch.
Uh oh!! My wife and I already created our top mud deck and it has been set/dried for 48 hrs. We have our liner over the curb.
Will it work to form the lath over the curb, then add the stucco as you instructed AFTER the top deck is done?
I sure hope so!!
Hi Kev,
Yes, that’s fine.
Thank you Roger!
Hey Roger,
How long should I let the stucco for the curb cure before I move on to the tile work?
Thanks for this site it’s been a great help!
Hi Joel,
24 hours.
Hello Floor Elf –
I cannot find the Stucco Base coat at any home improvement store. I did find Quickrete Quickwall though. Will this product work for the curb?
Hi Steve,
Yes.
Hello, I’m in a bit of a remote area. I only have two options, masons mix and quickcrete. Can I use either of these for my curb?
Regards,
Jeff
Hi Herk,
Quickrete concrete with a 5 parts sand to one part quickrete.
Hi Roger,
I used quikcrete mason’s mix for my curb…did I mess up? Should I take it off and use stucco?
Thank you again
Matloc
If it’s solid go ahead and use it. It should be fine.
are you an old dog?,and have you learned any new tricks {tiling}lately?
Hi John,
Yes, and no.
Hi Roger,
Had another comment written asking about a drain issue- it might have disappeared, but now I have a bigger problem. I see you’re pretty insistent on the use of the mud or stucco on the curb. We demoed our existing shower stall (it’s really large- made for 2, not that we group shower), and this is what the builders did 18 years ago for a curb: Four 2x4s stacked on one another, shower pan liner running up as far as the third 2×4, cement board screwed into top 2×4, cement board on the interior screwed into the side of the top 2×4 and lying over the top of the liner, cement board on the exterior screwed in wherever. Yay or nay? I can tell you there was no water getting in there after 18 years…. the water was getting in around the window they put in there instead. Thoughts??
If you’re installing a new liner you need to do it correctly. Sometimes things are done incorrectly and you get lucky, that’s what it sounds like with yours. What you’ve described it sounds like there is a bare 2×4 on top covered with nothing but backer – that isn’t waterproof. You want a waterproof membrane over every bare piece of wood in your shower or you’re going to have issues.
It MAY last, as that one has, but do you really want to take that chance?
Understood, and agreed. I was so tempted to take the same shortcut, but we won’t. Thank you for your willingness to share all of this information and empower people. This site is a gold mine of knowledge.
Hi Roger,
Got a question about installing a curb on very unlevel concrete. My basement is very old and the concrete has a large slope to it. What’s the best way to make the curb level? When putting down blocks there is about an inch height difference from one wall to the other.
Thanks for all of your advice. Your site has been extremely helpful!
Hi Sean,
Put down thinset, then pack an inch high layer of deck mud over it (1″ on the high end down to 2″ on the low end) to level it, then install your blocks over that with thinset.
I have a step that I used mud on. I couldn’t get it straight either. So I took it out.. it had cracked at the corner anyway… Glad it came off easily enough without damaging the membrane. . I cut hardiback board today to fit.. now I’m reading its a no no??
1. Why can’t you do it. ?
2. Any suggestions on how to get such a square curb. ?
thanks.
Hi Brenda,
1. Because you would be penetrating your membrane when you install the backer.
2. Yes, wet mud, patience.
Dear Roger,
Have you ever had to rescue a husband and wife from a DIY bathroom reno?
Did you have to be a witness at the trial?
Really, just want to thank you for this. Your tutorials and the comment section have saved my bathroom and my marriage.
Karma +10
Thanks Overconfident. Karma is always good.
And as to your questions – yes, and yes.
Would using Rapid Set Cement All instead of the Stucco mix be ok? Or is there a benefit of covering my curb with stucco mix vice concrete mix? Thank you.
Hi Steven,
No, regular cement does not have the amount of sand in it to compensate for the movement (regular seasonal movement) that your curb will need. The stucco mix or wet mud does. The cement WILL eventually crack, the stucco or mud will not.
I am considering doing a curved curb to create a “demi-peanut” shaped shower being wider at the entrance than at the opposite shower head end. I have made up the curb from layers of exterior plywood, cut to shape with a jig saw. Will it be difficult to get the liner to follow the curved curb? I am thinking I will have to cut it and overlap and use the expensive adhesive made specifically for the liner. Any other thoughts on issues related to doing a curved curb?
Hi Keith,
Yes, it’s going to be a pain in the ass. Your best option is to use a topical waterproofing liquid on the curb, but you’d need to cover it with cement board first.
If shower floor poured as shown and curb installed with a good finish and corners bull nosed then finished with a good concrete sealer would this be adequate with out tiling floor. (I’m thinking of using a colored dye) Then of course the walls would be tiled.
Hi Curt,
No. Deck mud is not a wear surface, even with a sealer. You would need to use regular concrete, but I know (literally) nothing about concrete shower floors. (Nothing wrong with them, I just don’t want to invest in the equipment to do something that someone wants once every five years. )
)
Hi Rodger,
Tried to create a curb, was using 2x4s covered with liner and lathe. I used deck mud but made it more wet no lime was used. Stick pretty good but it is not straight, the lathe made it bump out a bit. Saw in a post above I could use 1/4 backer with thunder underneath to get a good tile surface. Do I need to water proof the seams? How would I attach it to the curb?
Hi Roger,
Sorry for the spelling errors above. Too many beers… After reading further, I see that I can not put hardie backer on the curb. Doh! scratch that idea. What should I do to get a square curb? Can I add a stucco base coat over it? I used wet deck mud to start. Any tips to getting it square?
Another related question, the inside of my curb is only about 2 1/2 inches high. This is due to the preslope and final deck mud. I was using Quick pitch, and my curb was 3 2×4 high. After all the mud it is not that high on the inside of the shower, is 2 1/2 inches enough? If not what should I do at this point?
Hi Roger,
Me again…Can I use Kerdi Board over my pre-built curb? I know hardie backer is a no no. The Kerdi website website says that you can build curbs out of Kerdi board and that it can go over masonry or wood. I wouldn’t use nails but the unmodified thinset.
Looking forward to your responses!!
I suppose, but, like the backer, not really a good idea. More mud is your best option (stucco mix).
Oh, okay. Yes, you can go over it with stucco base.
Yes, 2 1/2″ is fine.
Hi Amy,
Not sure where you read that. It CAN be done, but it shouldn’t be done. It would be better to thinset over the curb and add deck mud, (better – wet mud) to straighten the curb out. Backer can be thinsetted to it, but again, not a good idea.