
This post describes the top, or overlay, of the curb for your traditionally waterproofed shower floor with a liner. The stuff you stick the tile to. It assumes (my posts often assume quite a bit – they are condescending little bastards…) that you already have the curb substrate built, your preslope in, and the liner installed. Those steps are described in the first couple of posts showing you how to build all that stuff here: How to create a shower floor for tile.
First I’ll answer a few questions I get constantly:
NO, YOU CAN NOT INSTALL HARDIBACKER TO YOUR CURB FOR YOUR TILE! (Unless you are using a topical waterproofing method for your shower floor.) There is no way to attach the hardi to your liner without puncturing it, which renders your waterproofing efforts useless. You need to have wire lath over your liner to hold it to the curb and wet mud installed over that to form a substrate for your tile.
Yes, you can use deck mud for your curb if you want to. However, it is not nearly as stable on the sides of your curb. It is not sticky. It may fall off the sides of your curb even after it cures, and take your tile with it. And it may crumble as you work with it after it cures, because you can’t pack it tightly enough to be dense enough on your curb. But yeah, you can use it… ![]()
No, you can not bond tile directly to your liner. No, you can not bond tile directly to your lath. Neither will last. Ever.
When you create your shower floor you are using deck mud. You need wet mud for your curb due to the vertical surfaces. Wet mud is almost identical to deck mud, it just has powdered masonry (or hydrated) lime added to it. A proper wet mud mix is 1 part portland cement, 1/2 – 1 part powdered masonry lime, and 4 parts sand. It is mixed just like deck mud except it needs more water. It should be the consistency of peanut butter (the creamy, not the chunky…)
Powdered lime is nasty stuff! Do not get it on your skin, it itches and burns at the very least and some people have horrible allergic reactions to it causing nasty rashes. Do not breathe it in! Seriously, it’s nasty stuff, handle it with extreme care.

Quikrete stucco base coat
But there is an easier way! I now usually use stucco base coat in place of wet mud when doing smaller areas such as just a curb or bench. It is a very similar mix. Although I don’t know what the exact ratios of the ingredients are it works and cures exactly like my wet mud. It is pre-mixed and bagged and you can find it in the concrete section of any big box store. So I’ll show you how to do your curb using that. Should you choose to mix your own wet mud everything is exactly the same.
Once you get your liner installed and all your dam corners in you need to cut strips of wire lath to fit over your curb. USE GLOVES! Wire lath is sharp and will slice the crap out of your hands! So wear gloves and be careful.
Measure from the liner to the top of the curb, up over the top and down to the floor on the outside of the curb. Subtract an inch from that measurement and this is how wide you want your strips to be. Once you do that cut it the length of your curb.
All the photos I have are of a double curb with a 90 degree angle. If yours is just one curb across the front of your shower it works the same way, but I get a lot of questions about these as well. You can click on any of them for a larger version.

Bent lath for curb

Bent lath for curb
After you get your lath strips cut you need to bend them into a ‘U’ shape. Measure the distance from your liner to the top of your curb and mark that on your lath. That will be your first fold. Fold it all the way over onto itself, not just a 90 degree angle. You want to overbend your lath so that when you put it over the top of your curb it will hold the liner in place.
Your second bend will be the width of your curb away from the first. If you have a 2×4 as your curb just take a scrap 2×4 and place it in the nook of the first fold and fold it around the 2×4. Same works if you’re using bricks. Once folded your lath should look like the photos on the right.
Take the lath and place it tightly over the liner on the curb. You can nail the OUTSIDE of the lath to hold it in place, the deck mud for your shower floor will anchor the inside. DO NOT nail the inside or top of your curb!

Lath wrapped over the curb

Lath wrapped over the curb and corner
The lath should fit snugly against the liner. Overbending it like you did causes it to spring against the liner rather than flapping in the wind. ‘Spring against the liner’ isn’t exactly the best description, but it’s the best I can come up with. Damnit Jim! I’m a tile guy, not a creative novelist!
If your curb is created out of brick you obviously can not nail the outside of it. The spring action (see, now it’s an action and everything…) will hold it in place.
The lath DOES have the ability to puncture your liner! So you need to be a bit careful with it. But you do not need to baby it, the liners are much more durable than you might think. In other words – don’t be afraid to touch the liner with the lath. ![]()
Once it’s in place you have an anchor for your mud so it will stay in place. Once the mud is packed onto the curb it will pack up under the wires of the lath and hold in place. With the outside corner, like this shower, I also cut an additional small piece of lath to wrap around the top of that corner, like the second picture of the lath on the curb.

Properly mixed stucco base
Once your lath is on the curb go ahead and install your top mud deck. That part can be found in Part 4 of creating a shower floor.
Now mix up some stucco base coat. The water ratios on the bag will actually give you about the correct consistency, but begin with a little less water and add a bit more as you mix just to be sure you don’t get it too thin (runny). Again – it should be about the consistency of peanut butter.

Packing mix into the lath
YOU DON’T NEED TO MIX THE ENTIRE BAG! ![]() I just put that there because I know somebody will. You just need enough for the curb. I don’t know how much that is, I can’t see your curb. You can always mix more if you need to.
I just put that there because I know somebody will. You just need enough for the curb. I don’t know how much that is, I can’t see your curb. You can always mix more if you need to.
I use a magnesium mason’s finish float to form and finish my curb (and decks) but you can also use a wooden float or flat trowel if you don’t have one.

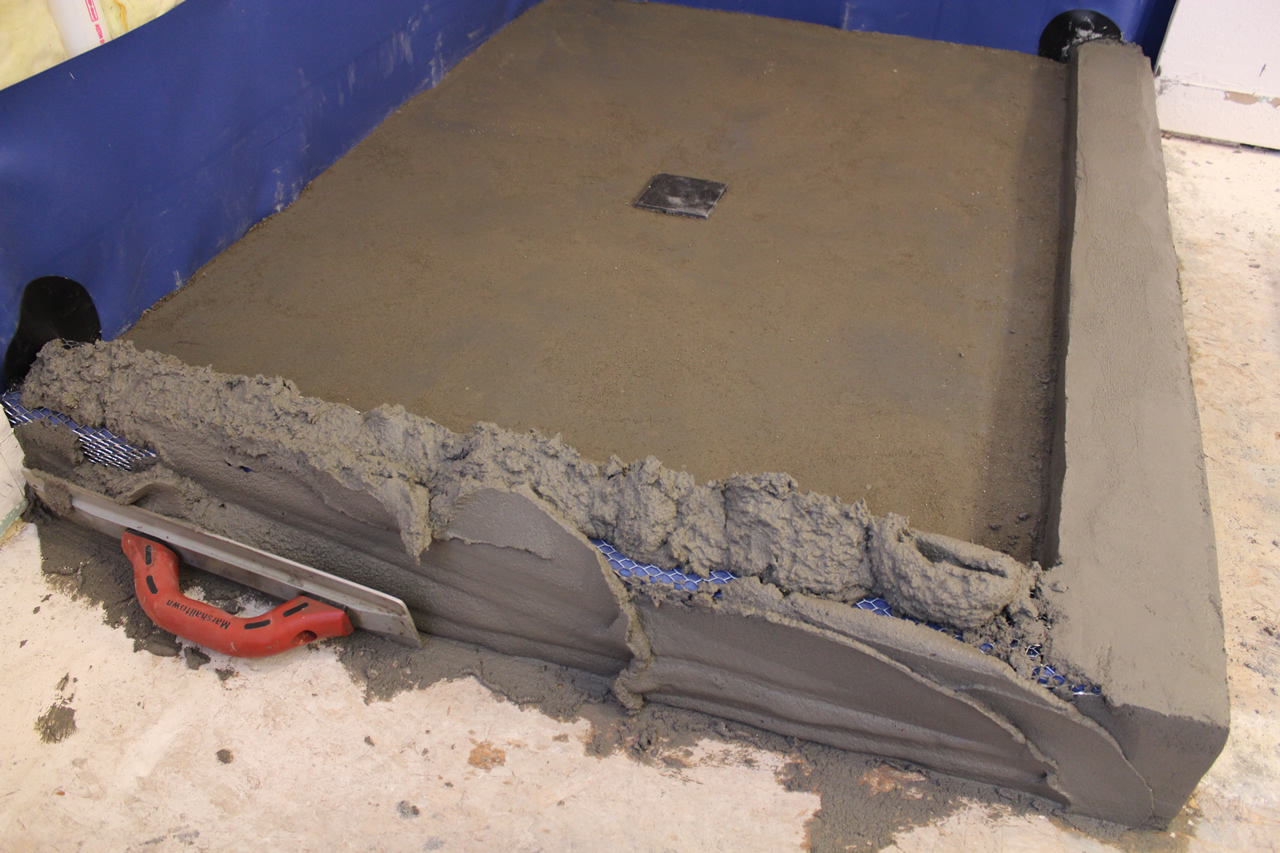
(very) rough finish on curb
Once it’s mixed just start by scooping a bunch of it onto the lath. Pack it into the lath well by running your float both ways to ensure it’s embedded beneath the wires of the lath, then start forming your curb. Ideally you want it about 1/2″ thick, but there is no real number for the thickness, so shoot for that. It’s not a big deal if you get it a little thinner or thicker than that. It’s just a guideline.
Packing and embedding mud into lath
You want to make sure that every side of your curb is straight (flat). You don’t want them to be wavy. You also want the top to slope slightly into the shower so water will drain into the shower rather than out of it. Your wood or bricks should also be sloped beneath the liner, but you want the tile on top sloped as well to rid the curb of most of the water.

Finished mud on curb
To finish the mix off and get a nice, smooth finish, dip your float or trowel in water and run it down the curb. It will smooth it all out. If you have any rough areas that just seem to get worse the more you mess with it (and you will) – leave it. After it cures you can always sand it down a bit to remove any uneven areas. Just make sure you have enough to sand down – that it’s overbuilt rather than underbuilt.

Finished curb ready for tile
It’s much easier to sand down to get what you need rather than trying to add something to the curb to get it where you need it.
Your curb does not need to be perfect! Oftentimes (typed with my pinkie in the air) the more you mess with it trying to get it perfect, the more you’re gonna screw it up. As long as it is flat (straight) and the top is level and sloped to the inside of the shower you can fix any imperfections after it cures or make up for inconsistencies with thinset as you set your tile.
Once it cures it’s ready for tile. You can bond tile directly to the curb now with thinset, it’s all ready to go.
Now, if you please, a moment of silence for the reader’s dog who burst into flames this morning because he tried to bond tile directly to the liner. You know who you are. And no laughing at him, before you read this you didn’t know how to do it either. (And he IS NOT the first one to do that!).
The dog in question is fine – we just had to snuff him out…


Really great feedback on this site!
I need advice on a shower curb repair. Several years ago our shower curb was originally built out of stacked 2″x4″ during new construction. Shluter was then applied with modified thin set directly onto the curb and then tiled over. Recently a long crack across the top of the curb tile appeared. I removed the all the tiles along the top of the curb including cutting out the Shluter the tile was directly on top of to make sure there was no moisture or mold which fortunately there was not.
My question is how to waterproof this area before retiling without hopefully having to remove all the tile from the curb. As of know, both vertical sides of the wooden curb are still tiled with Schluter below and the top of the wooden curb is exposed and clean from any of the previous install
Any help would be greatly appreciated!
Billy
Hi Billy,
A liquid elastomeric membrane along the top, sealing the sides to the existing kerdi. However, you need to either put 1/4″ backerboard or deck mud on top of that bare wood. Then just tile over it.
FYI: I would remove and rebuild the entire curb. It is the MOST vulnerable area of your shower. Putting a band-aid on it will only work for so long. It IS NOT a permanent solution.
I know you cannot use hardibacker for the curb with a PVC or plastic liner. (as you said it punctures it). Can you use hardibacker with the Schluter Kerdi system since you in-bed it in unmodified mortar over the hardiboard..? Their video shows a drywall curb with a mortar base which i definitely would’t do.
Hi Josh,
Yes you can.
I am lost on how I should run my tile over the curb, I built a curb Using wet mud and am very interested on how I tile up and over the curb, I plan on using mosaics on the actual shower floor and then use my wall tile to cover the verticals and horizontals of my curb. Do I run verticals first then the horizontal as a cap? Should I use transitions on the horizontal surface? I just want to make sure my cuts aren’t showing on the corners of the horizontal curb. Factory cuts are obviously better than my cuts and if I am creating a cap on the curb I will have my cut and a factory cut on the opposite corner? Probably not making any sense I am pretty particular about my work
Hi Steve,
I normally use bullnose on my curbs. If not, I’ll use a schluter trim. I always install the top as a cap, with the verticals going in first.
Hello
Can I install any ONE cement based layer (pre-slope or top slope) in multiple(2)days? – or is it required that any layer must be done in a single day?
I ask because I have a large shower and limited ability to bend in the floor for extended periods of time!!!
I know that there must be a cure time between layers i.e. wait for the pre-slope to cure before installing liner and then top slope.
Hi Matt,
You can do the preslope on multiple days, but the top deck really needs to be done in one so you don’t have a cold joint in it (weak spot).
OK, before I move on with this project, I have hardibacker, and a PVC liner. I had intended to use the 1/2″ hardibacker for my curb. I also planned on using redgaurd on the entire shower (including floorelf niche) . Is redgaurd an acceptable waterproofing method for a hardibacker curb? I’d like to move forward on the project, but I want it done correctly so as to not have to redo the whole thing. Anything special I should know or do if its OK? And one other question my niches are in an interior load bearing wall. The house is 10 years old so settling I would hope has occurred fully. Is this a bad plan? I live in a heavy snowfall area and would rather not have tiles popping with any kind of shifting. Of course one whole wall is also on this load bearing wall so I guess I’d be concerned about tiles in the whole thing not just the niches.
Hi Garth,
If you are using a pvc liner you CAN NOT use hardi on the curb. It would require puncturing the liner to attach the hardi. That’s a bad idea, even if you do redgard over it. Water will move UP hardi from the bottom, which means under your redgard, so it’s an exercise in futility. A niche in a load bearing wall is just fine as long as you don’t cut out any of the vertical studs (but you already knew that part).
So I installed the shower floor before setting down the lath for the curb and now I’m wondering if there is a way to secure the lath to the inside of the shower curb?
BTW I was originally using another person’s site to install the shower, however, I was uncomfortable with using cement board for the curb, so I decided to use your method instead. The only problem is I found your site after placing the shower floor down… (The other site punctures the curb, but installs red guard ontop)
Hi Don,
You should be able to scrape out a small channel, just enough to tuck the inside edge of the lath into. You can fill that back up as you install the mud over the curb.
And redgard over a punctured liner DOES NOT work! Goddamnit. Would you mind telling me where you found that info so I can read them the riot act? If you feel more comfortable you can email it to me at Roger@FloorElf.com.
Do you only use metal lathe on the curb if it’s a membrane liner?My shower has been hot mopped is it still needed?
Hi Joe,
You need to use it with hot mop as well. You still need to cover the curb with mud and the mud needs to bond to something.
Roger,
In the beginning of this article to state not to use backer board on curb, unless using a topical membrane, but don’t go any farther than that.
My question for you is, can i build a curb of 2×4 lumber, cover it with backer board, mud/tape the seams, then cover with same 2 coats of HydroBan as rest of shower, and tile over?
Thanks!!
Hi Brian,
Yes you can, hydroban is a topical membrane.
Roger, when you do wait to finish the curb say a day later have you embeded the lower half of the mesh in the deck mud on the inner side?
Hi John,
Not always. It can just lay over it, once you pack the wet mud onto it it’s not gonna go anywhere.
I am ready to install the wonderboards on the walls. After reading your
manuals on traditional shower instl and the comments I am lost as to
finish the instl of fasteners along the bottom of the cement boards to
the studs or the blockers between the studs. My floor membrane is
installed seven inches up the walls behind the cement boards. Does that
mean the bottom seven inches the board (the board is within 1/8 inch from
the final mud floor) will not be attached but will be held in place by the
floor tile and grout caulk???
Hi Larry,
Yes, that is correct. You can not penetrate the liner. But it is not held in place by tile and caulk. It should be shimmed out above the liner so you have a flat plane at the bottom that does not bow out.
Hi Roger
First I like to say thank you for all your information. Wow what a big help .
Ok here it is. Can you come and do my shower floor?
 Ha ha just kidding.
Thanks again .
I agree with everything posted above and like the Stucco as a replacement to the cement.
But we build an exterior edge form with a higher edge than the inside top of curb, pull the form out, pack the mesh, then secure the form and pack the stucco. Using the edge of the form I can set a pitch for the outer edge of the curb to the inside of the shower.
Not better … just different. Hope that helps.
One side of the metal lath seems smoother than the other. do you want to make sure the smooth side goes against the shower membrane?
Hi John,
On a floor it makes no difference. The ‘rough’ side is to hold mud on vertical surfaces until it cures.
Roger, does the mesh over the curb need to be up a little to get the mud under it or does it need to be right against the membrane and it still works to attach mud to it. Hope this makes sense.
Right against the membrane.
So, I bought the 3 books, tile layout, tips, and the topical walls standard base. The last one was the wrong one. I’m doing topical walls standard base, but with RedGArd (or equivalent)
My issue however, is I am doing a neo angle with knee walls on both sides of the door. This leads to an interesting problem. The door opening walls need to be parallel, hence the ends of the knee walls are at 45 degrees. How do I finish these edges? So what I have is essentially a 4.5″ strip coming from one wall, going down to the curb, across the curb, up the other side, and over to the other wall. I was thinking I could put bull nose on this strip (trimming one side (or both) slightly). This works fine until I get to the corner with the 45 degree angle. Should I just leave the transition from the horizontal to the vertical rough cut across the 4.5″ strip?
P.S. How about a book for this??????
I may have a solution. I can get a bullnose tile blade and cut my own bullnose.
Yes.
Hi Charlie,
Bullnose with miters. I really can’t be more specific without a photo or diagram of what you’re attempting to tile, though. And it would be a never-ending book, every situation is a little different.
Yea, I didn’t see a way to upload a photo.
Basically my issue is the knee wall comes out to a tip with 45 degree angle on it.
Miter one tile at a 45 and have the miter hanging past the corner, then cover the mitered edge with a bullnose.
I tried reading through the comments but couldn’t find my answer. Do you do the deck mud on the bottom of the shower and then wait until it dries before you do the stucco on the curb? Or do you do them both at the same time? Thank you
Hi Jon,
You can do either. It’s normally easier to wait until the next day if you have the time.
Thanks for all of the helpful tips on your site. I am about to do a remodel in a small hallway bath using your website and your bundle for how to waterproof shower walls and floors with a liquid topical. I bought the Kerri drain and am going to use Hydroban. I had a few questions. Do I run the hardi backer to the floor and then poor the pan? I did not see a diagram in the book for how low the hardi backer goes when pouring a pan for topical waterproofing but I thought I remembered reading a comment where this was asked and you verified the hardi backer should go all the way to the floor. Any insight on installing the drain? Should I do it when the pan is curing or after I pour the pan? What do you think about Quick-Pitch goof proof shower floors? Just a gimmick?
Hi Sal,
Yes, the backer can go all the way to the floor. Pack the pan against it. Install the drain first, then pack the pan around and under it. Quick-pitch is a good product, makes it much easier to get a proper slope.
Hi Roger,
Love your helpful information! We built the traditional shower pan following your instructions for our small 3′ x 4′ shower. The question is the curb has crumbled on the edges (from my step ladder accident yesterday). The curb was built months ago so I know it is completely dry. Is this normal that a few 1-2 inch chunks have crumbled off the edges? I am hoping that it can just be filled in with thinset when we tile or do you think another mud layer needs to be added.
Thank you in advance,
Holly
Hi Holly,
Yes, it’s completely normal for a naked curb to chip off when hit with a ladder. Once tiled it is super solid. Yes, you can fill it with thinset when you tile.
Stop swinging your ladder around all willy-nilly!
okay, so if I am going to finish my curb with granite, i am curious if i can nail my backer board on the curb. Based on your articles, nailing anything on the curb is BBAAAADDDD. But if the curb is covered with a solid piece of finished granite, will that still leak? I suppose if the water backs up to the bottom of the granite it could leak? It there another option for attaching continuous granite as opposed to tile?
Hi Herb,
No, you can not nail ANYTHING into the curb. You can create your curb normally and the granite is installed onto it with thinset – just like regular tile is. Nothing is different except it’s one piece of granite rather than five or six pieces of tile.
Hi Roger,
Shower is ready for tile, except for the curb. I finished the curb according to your instructions, but don’t think I am very good w/ stucco. It looks horrible. Not flat in many areas, not smooth. The lath is exposed in some areas due to the stucco falling apart once the slightest amount of weight is exerted upon it. My intentions are to demo the stucco, remove the lath around the curb (leave it between the pan an the bricks (concrete slab), cut the liner on the inside vertical of the curb and then redguard the curb….ensuring that the redguard leads any potential water on top of the liner not beneath it. What are your thoughts on doing that?
Hi Duane,
I would not do that. Once you cut the liner inside your shower it is compromised. You can go over it again with more stucco mix. You can even thinset 1/4″ backer to it to give you a solid tiling surface.
I think I will go the 1/4″ backer route. Thanks, did’nt think of that.
Hi Roger
I have been reading your articles and they are very informative. Thanks for the info.
Mohammad khan
Hey Roger,
How important is the lime for the curb wet mud? I can’t find the quikrete stucco mix in either local big box and the 80lb bag of lime is just overkill for the small amount of mud I need. Can you suggest any alternatives (substitute for the lime or another premix like the stucco)?
Thanks,
Pat
Hi Pat,
Those are the only two methods I am aware of. Your big box can order any quickrete product, you’ll just need to wait a couple days for it.
finally someone who completely understands me
I am having a 3-1/2′ x 8′ porcelain tile shower surround installed in a master bathroom. The tile sizes is 12″ x 24″ I have 4 questions: 1) Can these tiles be installed on the wall without grout lines (in other words butted up to each other)? 2) If I have to use grout, would a 1/16″ grout line work or do I need to go to 1/8″? 3) Is Latricrete SpectraLock sanded grout a maintenance-free grout? I was told it is a grout and sealer combined. (4) Is 1/2″ hardi plank enough moisture barrier? Thank you.
Hi Arlene,
If you use the search box at the top of the page all of your questions are covered.
1. Tile without grout
2. Grout line size
3. Spectralock
4. Cement backerboard IS NOT waterproof
Really appreciate all the great tile info on your website! Wish all DIY projects had a resource as complete as this! My question is in regards to the curb height. I’m doing a shower in a basement bathroom so I’m planning on using bricks as the curb. However, if my math is right 2 layers of bricks gives you roughly 4 inches, plus a small amount for thinset, liner. Then add 1/2″ for lathe/stucco mud and say 1/4″ for thinset/tile on top of the curb. That puts you at 4 3/4″ curb height. If you use the methods you’ve described for pre-slope/top coat plus tile you are at 3 1/4″.
My question is don’t you want more than 1 1/2″ difference between the top of the curb and the shower floor? Perhaps I missed something (very possible). And another brick higher seems too high. Thoughts?
Hi KT,
1 1/2″ is normally fine on the inside of the curb. If you want more than that you can stack the bricks on the side rather than the bottom, or you can simply build up the mud on top to whatever height you require.